Hannan Mullet

Shoulder Conditions

Frozen Shoulder

A Patient’s Experience

Frozen Shoulder Story

Rebecca is a very active fit healthy woman who works as an accountant. She has three teenage daughters and likes to play tennis and golf when she has time. Last February she became aware of pain in her right shoulder when she overextended her shoulder, for example; when putting something into a high shelf.

She hadn’t had any particular trauma to her shoulder but it felt maybe she had been over doing it in the gym. She took some ibuprofen and rested her shoulder but it became more painful and she had discomfort lying on the side. She became aware that her range of motion was decreasing and soon she had difficulty fastening her bra. Her general practitioner prescribed some strong pain medication and anti-inflammatories but unfortunately her sleep disturbance became worse and she was waking up several times a night.

She tried some physiotherapy but found the stretching quite painful and unfortunately, she remained stiff. Her physiotherapist recommended an MRI scan to exclude a rotator cuff tear and this showed thickening of the shoulder capsule and a partial thickness tear of the rotator cuff. After four months she remained stiff and painful and made an appointment to see Mr. Mullett.

He examined her and explained that she was suffering from a frozen shoulder or adhesive capsulitis. There are three stages in the condition.

Initially the shoulder becomes painful and lose his range of motion. This can this can happen spontaneously or sometimes after minor trauma such as a simple fall. A patient generally experiences pain when they suddenly move the arm such as reaching for something. Infrequently it its painful at night causing sleep disturbance and a patient recognizes restricted range of motion for example when dressing.

In the second stage the pain becomes more bearable but the shoulder remains stiff and affects activities such as tennis or golf.

In the third stage the pain of restricted range of motion resolve and the patient can resume normal activities. Only a minority of patients who failed to improve with time and treatment such as injections and are very symptomatic require arthroscopic release keyhole surgery.

Mr. Mullet felt Rebecca’s shoulder was in the first stage of the process and injected the shoulder to reduce inflammation and help pain. He was able to give her the injection on the same day as the consultation.He also gave her some gentle stretching exercises to do when the pain was better.

Thankfully, the injection began to work within a few days and although the shoulder was quite restricted the pain was more tolerable and she was able to sleep.

A month later he gave her a second injection and recommended physiotherapy at that stage as the pain had largely gone but the shoulder was still restricted. He explained to her that she could do any activity she liked and that the partial thickness tear seen on the MRI scan was not mechanically important and a common feature in patients over the age of 40.

Over several months Rebecca noticed that her range of motion was improving and finally in the late summer she was able to return to playing golf first, and then tennis.

What Is Frozen Shoulder?

What is a frozen shoulder?

2.+Timeline-for-Frozen-Shoulder

Your shoulder is made up of three bones that form a ball-and-socket joint. They are your upper arm (humerus), shoulder blade (scapula), and collarbone (clavicle). There’s also tissue surrounding your shoulder joint that holds everything together. This
is called the shoulder capsule.


With frozen shoulder, the capsule becomes so thick and tight that it’s hard to move and any movement is painful. This tends to progress and gradually, gets worse. The pain and stiffness reach a climax point and then finally go away, the reduction
in pain and stiffness is also a gradual process. This can take anywhere from a year to 3 years.


The following leaflet may be helpful.*(link to frozen shoulder leaflet)


Causes


It’s not clear why some people develop it, but some groups are more at risk.


Frozen shoulder happens more often in women than men, and you’re more likely to get it if you’re between the ages of 40 and 60. Your risk might also go up if you’re in the process of recovering from a medical condition like a stroke, or surgery
like a mastectomy that keeps you from moving your arm.


Certain medical conditions can increase your risk too. You may also be more likely to get frozen shoulder if you have diabetes. About 10% to 20% of people with diabetes get frozen shoulder. Other medical problems like heart disease, thyroid
disease, or Parkinson’s disease are linked to frozen shoulder, too.


Stage One


The patient usually gradually develops initially pain following restricted range of motion (stiffness) of the shoulder joint. Typically there is no particular cause though a frozen shoulder may be triggered by a simple trauma i.e. following a fall or other injury or sometimes after surgery either on the shoulder or other operations eg. Removal of gallbladder or cardiac surgery. The first stage of frozen shoulder is the most painful and patients typically have pain if they suddenly move the shoulder (jerk pain) and pain at night that may disturb sleep. Patients may have difficulty with activities of daily living such as dressing , washing and household chores. Stage one generally takes in the order of 4-6 months though there can be quite a variation.


Stage Two


In the second stage the shoulder is less painful though remains restricted and the patient will have difficulty performing many activities particularly moving the arm behind the back for example to secure a bra.


Stage Three


In stage the pain has resolved completely and the range of motion returns to normal. The total time for the range of motion to return completely ranges from 18 months to 2 year and in fact may be longer in patients with diabetes or hypothyroidism.

Investigations

Frozen shoulder can usually be by diagnosed on the basis of the patient’s history and examination. There are few other conditions in the shoulder which lead to such rapid loss of range of motion and restriction. A plain X Ray is useful to exclude arthritis of the shoulder or if there is a history of trauma any dislocation or fracture. An MRI scan can help exclude other conditions such as a rotator cuff tear. An MRI scan will not however definitively diagnose a frozen shoulder and in fact in this age group there are often unrelated coincidental findings such as degenerative tears of the labrum, degenerative changes of the acromioclavicular joint and partial tears of the rotator cuff which are normal findings in patients over the age of 40.

Treatment options available

Treatment

Frozen shoulder is a generally very painful in the initial stages and it is important to take adequate painkillers and rest the shoulder if it very painful. There is no advantage in trying to vigorously mobilising the shoulder at this stage as it is too inflamed and will only aggravate the pain.

In the first stage of the condition a corticosteroid injection can be very helpful in improving pain. Gentle stretching to maintain motion is useful but avoid painful movements. This can be repeated a second time as needed.

Hydro-dilatation is a radiological procedure which can be used in Stage 1 or 2 frozen shoulder. Local anaesthetic and steroid are injected into the shoulder Joint under image control. This is performed as an outpatient under local anesthetic.

In the majority of patients surgical intervention is not required. However, it is important to remember that if you suffer from a frozen shoulder on one side, you may also develop frozen shoulder on the other.

Approximately 10% of patience with frozen shoulder who do not respond two injections or Hydra dilatation may require surgical intervention.

Arthroscopic Capsular Release

This is keyhole surgery to release the contracted capsule (link to arthroscopic release) .

The aim of the surgery is to release the contracted capsule using an instrument called a radiofrequency probe. The usual findings at the time of surgery is that the capsule is often red and inflamed and much thicker than it should be.

Unfortunately, patients who have diabetes or hypothyroidism tend to get a more severe form of frozen shoulder and often they require surgical intervention. The good news is that once a frozen shoulder resolves it never recurs.

What is the Required Rehabilitation?

Anterior Deltoid Strengthening Programme

The rotator cuff muscles are a group of muscles that originate from your shoulder blade and insert into the top of your humerus. These muscles are responsible for controlling the movement of your arm into elevation. If there is a large tear of these tendons, it can be difficult to lift your arm away from the body. Fortunately, there is another large muscle called the Deltoid which can be re-educated to compensate for the torn rotator cuff.
 
The following exercises should be done three times a day and it may take up to 3 months to feel the benefits of the exercises. The exercises start lying down flat to reduce the work against gravity and will be progressed as the strength improves. This progression will be guided by your chartered physiotherapist
 
Perform these exercises 10 times, 3-5 times a day. Stop exercising if your shoulder pain increases.

You should expect to see some improvement by 6 to 12 weeks.


Pendular Exercises

The pendular exercises can be done as a warm up.
 
  • Bend over supporting yourself with the good arm
  • Start moving your affected arm in a circle 10 times
  • Then move your arm backwards and forwards 10 times
  • Next move your affected arm side to side 10 times

Stage 1

Lie down flat on your back, with a pillow supporting your head. Support the elbow of the affected arm on a rolled towel. Bend the elbow of the affected arm. Now raise our arm to 90 degrees vertical, using the stronger arm to assist if necessary. Once you have got to 90 degrees, you can straighten your elbow. Now attempt to hold your arm in this upright postion with its own strength.

Stage 2

Slowly, with your fingers, wrist and elbow straight move the arm in small circular movements clockwise and counter clockwise. Gradually increase the circle as tolerated.

With your fingers, wrist and elbow straight, move the arm forwards and backwards in line with the outside leg. Start with a small arc of motion. Keep the movement smooth and continuous for 5 minutes or until fatigue.


As you get more confident in controlling your shoulder movement, gradually increase the range of motion until your arm will move from the side of your thigh to above your head, touching the bed and return.

Stage 3 – Progress to light weight

As you get more confident in controlling your shoulder movement, a light weight e.g. small paperweight, should be held in the affected hand and you repeat the movement outlined above. Once you can control the movement lying flat with a weight in your hand you can move onto stage 4.

Stage 4 – Progress to an inclined position

This exercise is performed sitting up in an inclined position, using a recliner chair, deck chair or simply put some pillows underneath your back to recline your position. Repeat the exercise again, starting first without any weights and progress to use the same light weight you used before in the lying flat position.

Rotator Cuff Small Protocol


Post Operative Guidelines –
 

Rotator Cuff Repair -Small and medium (<3cm)

Mr.Hannan Mullett ,Consultant Shoulder Surgeon


The risk of re-tear is greatest in the first 12 weeks post-surgery. Groups with greater risk of re-tear include older patients, smokers, diabetics, those with minimal postoperative symptoms and those with >3 cm tears.


The risk of stiffness is greatest in younger patients ( <50 yrs.), those with PASTA type rotator cuff tears (Partial articular supraspinatus tension avulsion), those having an associated labral repair
and single tendon repairs.


Timescales are guidelines and are dependent on individual factors and pre-operative status. Factors that may affect progression rate:

  • Pre-operative stiffness
  • Age
  • Tissue quality
  • Associated procedures


Acute phase (0-4 weeks)

Histology

Peak collagen deposition and growth factors 10 days post op with plateau at 28-56 days. Requires gentle stress to guide fibre orientation but no strain.


Goals

  1. Protect surgical repair and optimize tissue healing
  2. Diminish pain and inflammation
  3. Gentle regaining range of motion respecting pain and avoiding compensatory movement patterns.
  4. Minimise muscle inhibition


Immobilisation

  • Patients generally wear a sling for 2-4 weeks for comfort and to avoid stressing the repair. The sling is removed to allow axillary hygiene and when patient is performing their exercises
  • Patients can use the arm below the elbow e.g. using computer, reading
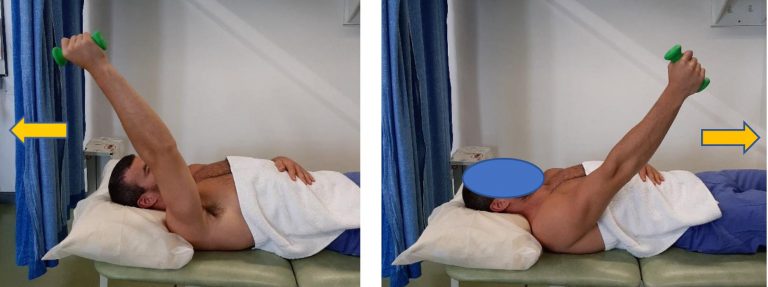
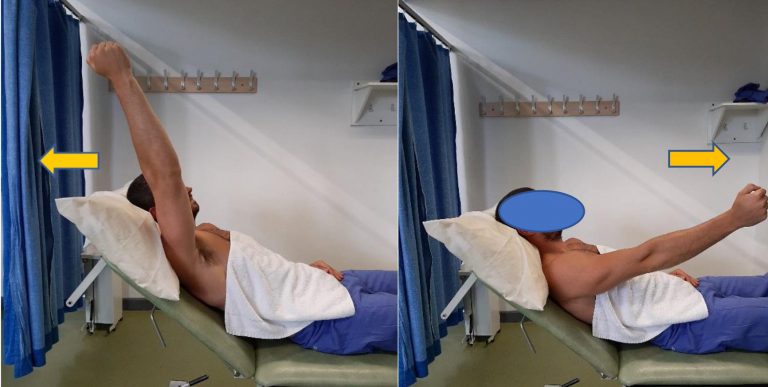
  • Avoid combined abduction / external rotation and any forced end range stretches
  • Cryotherapy as needed
  • Elbow, wrist and hand exercises
  • Encourage use of hand in sling for light unloaded, pain-free activities. Patients that use the hand of the operated arm during the immobilization phase have better outcomes in terms of pain and function.
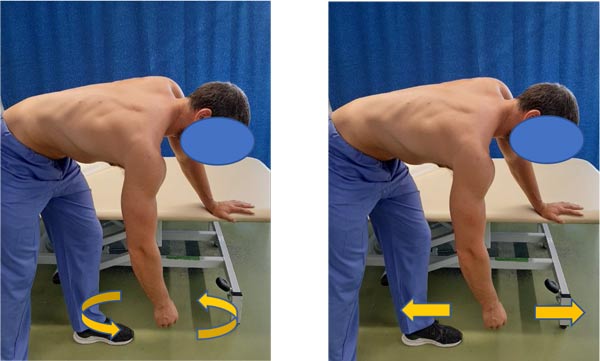
  • Closed kinetic chain exercises – low load on the shoulder and ensuring congruency scapula on thorax; e.g. table slides, walking away from the table
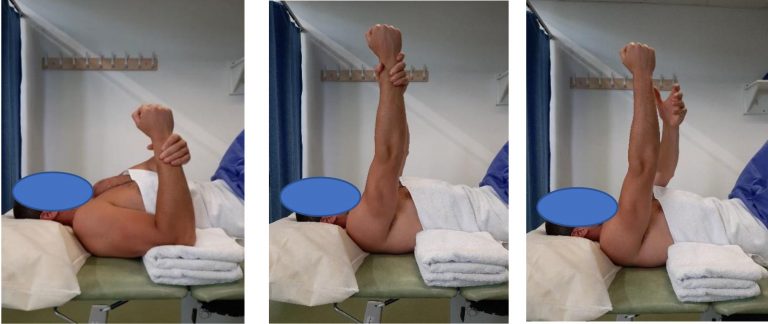
  • – Active assisted / active supported mobilization within the limits of pain
  • Submaximal isometrics ( <30% MVC) rotator cuff
  • Active scapula exercises e.g. shoulder shrug


Intermediate phase (4-8 weeks)

Histology

Inflammatory and repair phase has passed and healing progressed to remodelling phase. The application of low-level force during this time frame aids in orientation of fibres within collagen matrix and enhances tensile strength of repair.

Goals

  1. Preserve integrity of repair. Patients who progress quickly with minimum symptoms must be educated to avoid early loading.
  2. Improve functional range of movement including full elevation
  3. Re-educate cuff recruitment and scapula control through range
  4. Improve neuromuscular control by re-educating sensorimotor / proprioceptive function
  5. Emphasize normal patterns of movement


Rehabilitation

  • Avoid combined abduction / external rotation
  • Avoid forced end range stretches
  • Avoid lifting / loading until 12 weeks
  • Gentle mobilization of capsular restriction if necessary
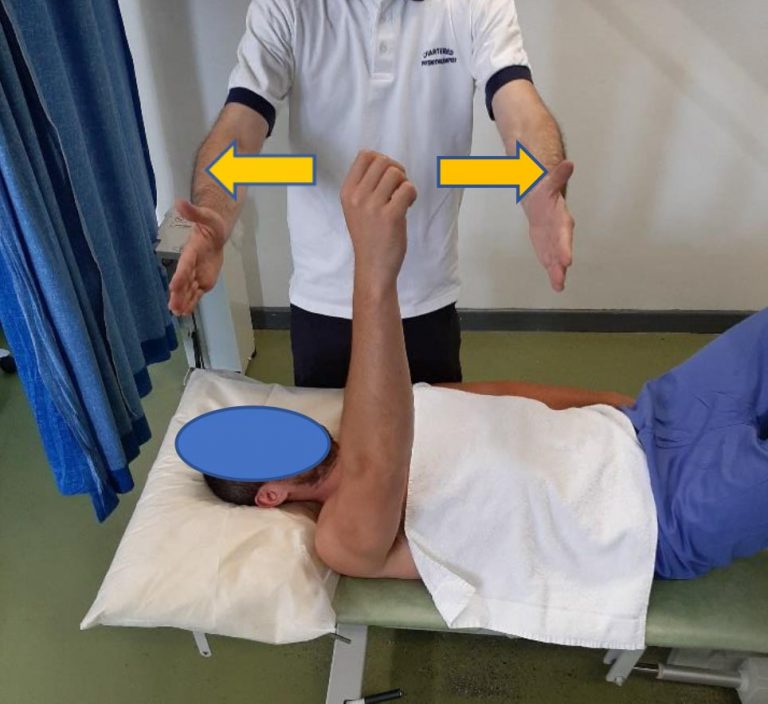
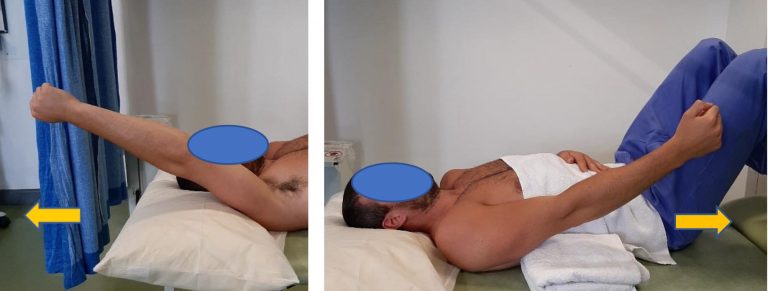
  • Progress cuff and scapula recruitment through range. Any exercise prescription should emphasis on good cuff and scapula control. Active assisted exercises progressing to active exercises-utilise short lever, supine and closed kinetic chain.
    Avoid long lever open chain exercises until 12 weeks
  • Progress kinetic chain integration
  • Increase function, emphasis on correct movement pattern
  • Closed kinetic chain work to enhance co-contraction


Late stage 8-12 weeks

Histology

Tendon to bone healing should be able to endure the initiation of strengthening exercises


Goals

  1. Restore full active range of movement
  2. Establish optimal neuromuscular control
  3. Restore optimal cuff and scapula control through range and under load
  4. Optimise functional upper limb strength and endurance
  5. Return to full work / sport and recreational activities


Rehabilitation

  • Regain optimal range of motion including combined positions
  • Through range strengthening of rotator cuff and scapular stabilisers
  • Enhance neuromuscular control through range
  • Closed kinetic chain exercises with increased load
  • Functional strengthening and endurance exercises


Phase 4 – advanced strengthening (12-16 weeks)

Histology

Remodeling phase is close to completion and the repaired rotator cuff tissue is relatively mature, therefore able to withstand greater stresses.


Goal

  • Return to work / sport with optimal control and strength


Rehabilitation

  • Progression of strength training with optimal control and movement pattern
  • Sport specific training
  • Endurance training and fatigue resistance
  • Endurance training and fatigue resistance
  • Promote concept of prevention


Return to sport

The interval sports programme should only begin after the patient has been cleared by the surgeon and has achieved symmetric motion and strength, normal scapulothoracic kinematics and has no complaints of pain at rest or with activities. Sport specific training exercises should only be commenced when the patient is fully rested and after a 5-10 minute cardiovascular warm-up. The programme should be performed three times per week with at least one rest day in between sessions. A maintenance exercise programme focusing on cardiovascular endurance and flexibility along with scapulothoracic, rotator cuff, lower extremity and core strength should be performed on alternate days.


Functional Milestones

  • Driving -depends on side and whether automatic generally after 4-6 weeks when patient has adequate control
  • Swimming 12-16 weeks
  • Golf 16 weeks


Reference

Oliver A van der Meijden et al (2012) Rehabilitation after arthroscopic rotator cuff repair: Current concepts review and evidence-based guidelines. International Journal of Sports Physical Therapy 7(2): 197-218


Detailed Anatomy of the shoulder

Bones & Joints

The shoulder is made of up 3 bones that interact together to for a supporting structure for the upper limb. We refer to this grouping of bones as “the shoulder girdle”. The bones of the shoulder girdle are;


  • The Humerus – the upper arm bone with the ‘humeral head’ (the ball of the shoulder joint) on the top end
  • The Scapula – the shoulder blade. There a number of parts to the scapula.
  • the ‘glenoid’ (the socket of the shoulder joint)
  • the ‘acromion’ (which covers the top of the glenohumeral joint and attaches the scapula to the clavicle)
  • the ‘coracoid’ (a bony ridge at the front of the scapular to which a number of ligaments and muscles attach)
  • The Clavicle – the collar bone which connects the acromion part of the scapula to the sternum (the breast bone) ‘strutting’ the shoulder out. This is the only direct bone connection that the shoulder girdle has with the rest of the skeleton.

Where a bone come into contact with another is known as a joint. The joints of the shoulder are;


  • The Glenohumeral Joint – formed between the humeral head (ball) and the glenoid (socket).
  • The Acromioclavicular Joint – the joint that connects the scapula to the outer end of the clavicle
  • The Sternoclavicular Joint- the joint that connects the inner end of the clavicle to sternum. This is the only bony connection between the ‘shoulder girdle’ and the main the skeleton
  • The Scapulothoracic Joint – this joint involves the movement of the scapula over the ribs at the back of the chest. This is a ‘psuedo’ joint (not a real joint as it does not have any articular cartilage.

Capsule and Ligaments

The tissue components within the Shoulder Joint itself;


  • The Glenoid Labrum – this is a ‘rim’ of tissue that goes around the outer edge of the glenoid, the tendon of the long head of biceps attaches to the top part of the labrum. The labrum effectively deepens the glenoid socket which helps to increase the stability of the humeral head. It works a bit like a ‘chock’ under a wheel preventing the head from ‘rolling’ over the edge.
  • The Joint Capsule – this is a watertight sac that surrounds the joint. It is formed circumferentially from around the base of the glenoid socket and passes outwards to join circumferentially around the neck of the humeral head. The inner lining of the sac is covered with synovial tissue which produces synovial fluid that lubricates the joint and provides joint nutrition.


The bones and joint of the shoulder are held in position by strips of very strong tissue, known as ligaments. They attach bone to bone where as a tendon attaches muscle to bone. The main ligaments of the shoulder girdle are:


  • The Glenohumeral Ligaments (GHL)– within the joint capsule there are 4 strong ligaments that connect the glenoid to the humerus. These are the main structures that keep the shoulder in place and stop it from dislocating. There are 3 ligaments at the front (Superior, Middle & Anterior Inferior Glenohumeral Ligaments) and 1 ligament at the back of the joint (Posterior Inferior Glenohumeral Ligament).
  • The CoracoAcromial Ligament (CAL) – this ligament connects the acromion to the coracoid forming a tunnel. The Rotator Cuff tendons pass under this tunnel. In some circumstances the tip of the acromion and the ligament can thicken and cause Impingement to the tendons as they run underneath
  • The Acromioclavicular Ligaments (ACL) – these are short ligaments that attach the clavicle to the acromion within the acromioclavicular joint (AC jt)
  • The Coracoclavicular Ligaments (CCL) – these are 2 ligaments that connect the clavicle to the coracoid. They help to supply additional stability to the clavicle and the ACjt.

Rotator cuff

The Rotator Cuff This refers to a group of muscles that hold the head of the upper arm into the socket of the shoulder. These muscles all insert into the bone as tendons so we often refer to the structure as the rotator cuff tendons. This layer lies on top of the bones and connective tissue.

The Rotator Cuff Tendons – this is formed by a group of 4 tendons that connect the deepest layer of 4 muscles to the humerus. These muscles are,

  • Subscapularis
  • Supraspinatus
  • Infraspinatus
  • Teres Minor

The muscles surround the shoulder and as their 4 tendons pass over the joint they converge together. As these bands of tissue attach onto the humerus they blend together and form a ‘tendon cuff’. This is known as the Rotator Cuff

The Biceps Tendon – the Biceps muscle, on the front of the arm, is formed from 2 tendons; the long head and short head. The Long Head of Biceps tendon begins at the top of the glenoid (with the labrum) and passes out through the shoulder joint to connect to the biceps muscle. The Rotator Cuff tendons and the Long Head of Biceps tendon are positioned very close to each other and are often both affected by injury at the same time. The Rotator Cuff tendons pass underneath the acromion through the Subacromial Space as they insert into the humerus (Fig 9). The narrow ‘clearance space’ underneath the acromion is the commonest place for Rotator Cuff problems to occur.

Additional supporting muscles There are a large number of muscles around the shoulder which are responsible for moving, stabilising and supporting the shoulder girdle. The muscles can be divided into 4 groups.

Deep Muscles (Intrinsic / Rotator Cuff Muscles) – these are the 4 muscles mentioned earlier whose tendons form the rotator cuff. The muscles all arise from the blade (flat surface) of the scapula and pass over the shoulder joint with the tendons attaching onto the humerus.

  • Subscapularis
  • Supraspinatus
  • Infraspinatus
Teres Minor These muscles often function as a group and are involved in raising, rotating and moving the shoulder in many directions. The combined pull of the Rotator Cuff muscles also pulls the humeral head into the socket of the glenoid helping to stabilise the glenohumeral joint.

Intermediate Muscles – These muscles provide additional stability and strength to the glenohumeral joint and the shoulder girdle.

Superficial Muscles (Extrinsic) – These are the large muscles that can be seen around the shoulder externally and provide strength and powerful movements. • Deltoid – this is the large muscle over the top and the front of the shoulder which provides the power to lift the shoulder after the rotator cuff muscles have begun the movement

Pectoralis Major – this is the large muscle over the front of the chest.

Biceps – this is the powerful muscle over the front of the upper arm that flexes the elbow. One of the Biceps tendons (the Long Head) arise from within the shoulder joint. Problems can occur with the stability of the Shoulder if the sequential rhythm in which these muscles contract to move the shoulder is disturbed

Back Muscles (Posterior) – these muscles are involved in suspending the scapula onto the back of the chest wall, stabilising the scapula and moving the scapula over the chest wall (scapulothoracic joint). A number of these muscles, including trapezius, levator scapulae and the rhomboids, originate from the vertebrae of the cervical and thoracic spine. Problems can occur with the smooth movement of the scapula over the chest wall if these muscles are weakened or are not working properly.