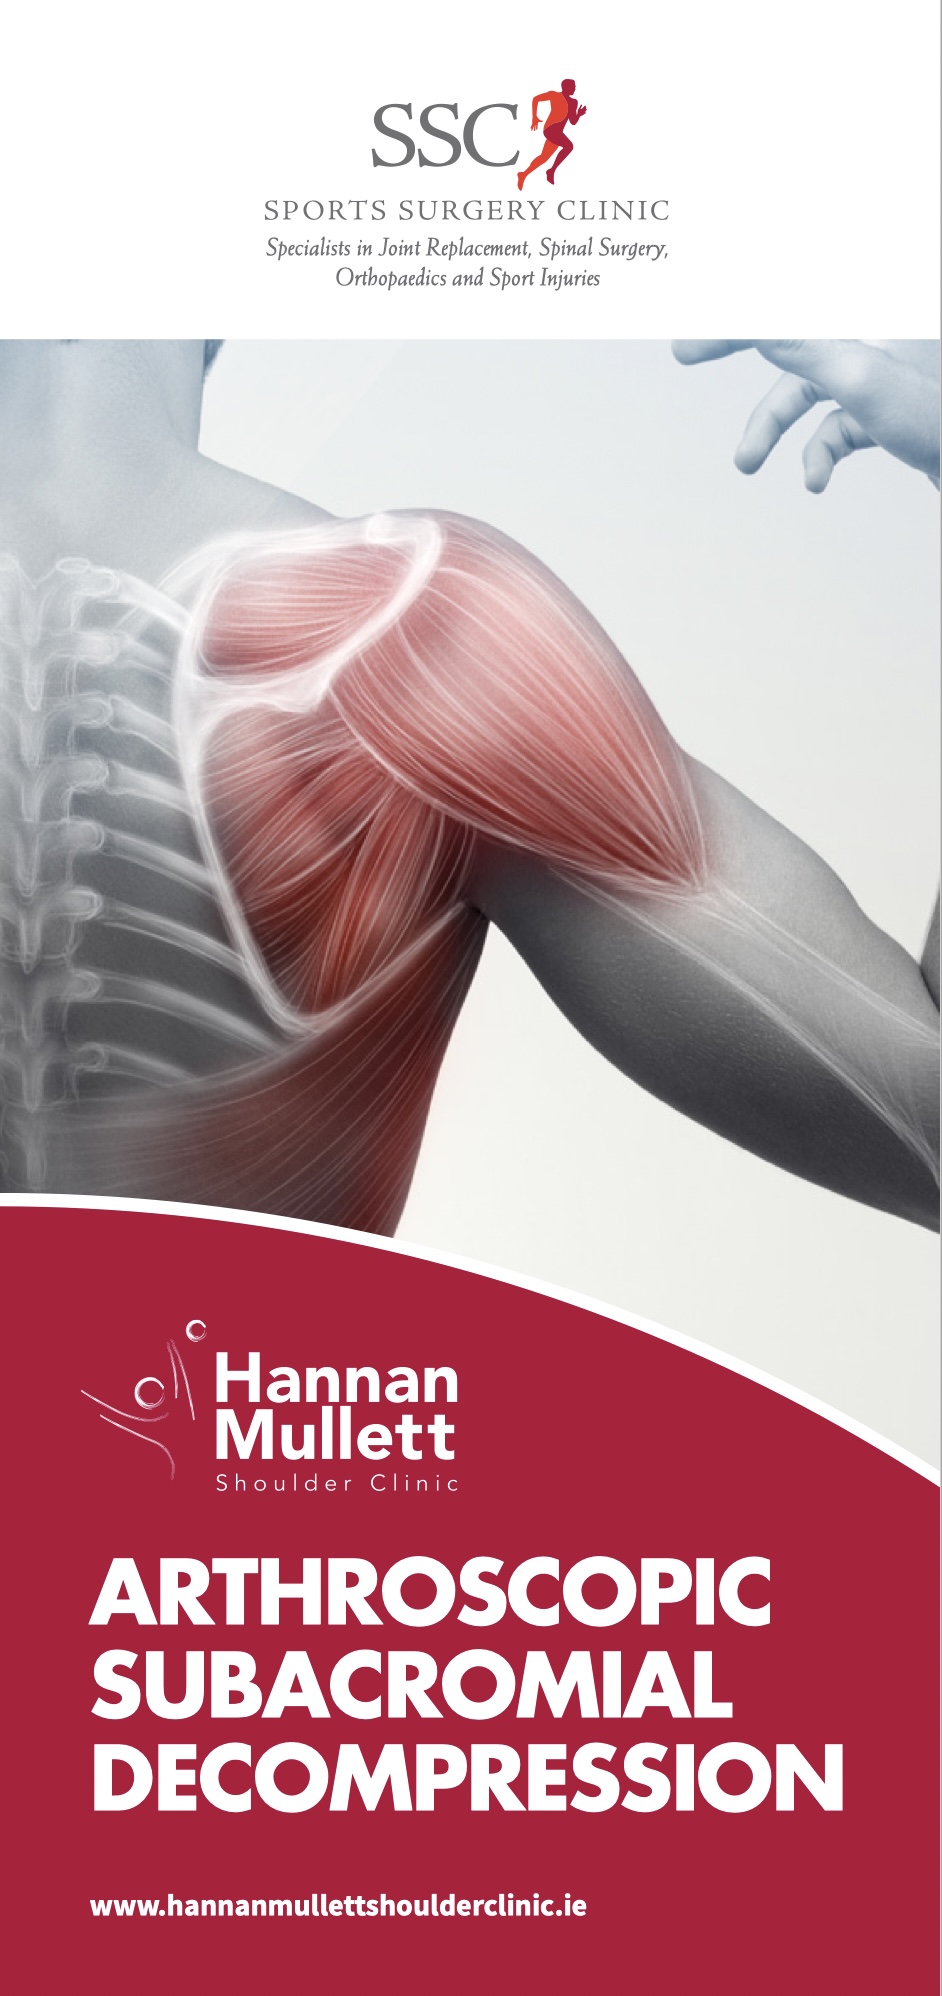
Hannan Mullet

Shoulder Conditions

Shoulder Arthritis

A Patient’s Experience

Shoulder Arthritis story

Mary knew she would have to get something done with her painful shoulder when she had another disturbed night’s sleep despite having taken two paracetamol and her usual difene. It had started to pain her 18 months earlier when she had noticed a twinge playing golf but now even simple things like driving her car were a struggle.She lived alone and was having difficult keeping her garden She dreaded the winter as the cold weather made it far worse and the pain reminded her of the hip arthritis which had given her so much trouble before she had a successful hip replacement. She had tried physiotherapy and acupuncture but unfortunately it didn’t help. Her doctor arranged xrays which confimed her fear that she had severe arthritis of the shoulder. She attended Mr. Mullett who explained that the joint surfaces had worn away and she effectively had bone rubbing against bone which was why her shoulder creaked.. He explained that although steroid injections would probably bring some relief it was likely given the degree of damage that this would be short lived and tended to get less effective with time. Mr Mullett suggested shoulder replacement surgery which he said had a good chance of reducing her constant pain and allowing her to get back to her active lifestyle.While she had many friends who like her had had either hip or knee replacments she didn’t realise that the shoulder could also be replaced. Mr Mullett went through what the surgery and recovery would involve and made arrangments for her to have a CT scan to have a closer look at the damaged joint and to plan the surgery. Mary attended the preassesment clinic and was passed as fit for surgery which was scheduled.Mary spent three days in hospital following her replacement surgery at the sports surgery clinic. She was immediately able to use her arm to feed herself, brush her teeth, use her computer and do many of her normal activities. She had a waterproof dressing and was able to have a shower on the day following surgery.


She spent a further few weeks staying with her daughter who helped her during her convalescence. Although there naturally was some discomfort following the surgery the severe arthritic pain and creaking from her shoulder was gone. She wore a sling for a four week period and continued doing the exercises she had been shown in the hospital by the physiotherapist. Mr. Mullett was happy with her progress when she went for her post-op visit and recommended that she could start driving at six weeks following the surgery. She made steady progress and was able to gently get back into golf at 6 months following the surgery

What Is Shoulder Arthritis?

What is Shoulder Arthritis?

Arthritis is due to the progressive loss of the smooth surface covering the joint surface ( articular cartilage). It can be due to osteoarthritis (“wear and tear”) , rheumatoid arthritis, avascular necrosis or post-traumatic arthritis (following injury to the joint). Thankfully shoulder arthritis is not as common as hip or knee arthritis as it is a non-weight-bearing joint.

What are the symptoms of Shoulder Athritis?

The most common symptoms of shoulder arthritis or of pain and loss of range of motion. Patients often complain of pain particularly in cold weather. I noticed difficulty with activities above the horizontal for example taking something from a high shelf. They may experience creaking in the joint. As the disease progresses the pain tends to get more severe and most patients develop significant pain at night which can disturb their sleep.

How is shoulder arthritis diagnosed?

The diagnosis is usually made from a combination of the patients symptoms and clinical examination. By the time significant arthritis has developed the patient usually will have lost a good deal of the range of motion. We will check the shoulder for strength to assess the integrity of the rotator cuff muscles. X-rays are the most useful investigation for Shoulder arthritis and in fact show the bone damage better than MRI scan. MRI scan is helpful in evaluating the rest of the soft tissues such as the rotator cuff. Before shoulder replacement we frequently use CT scan to check the degree of bone damage and to plan our surgery for best outcome.


Treatment options available

Treatment of shoulder arthritis

What Treatments are available?


Treatments are divided into non-operative and operative treatments

Non-Operative treatments:


  • Rest or change in activities to avoid provoking pain. You may need to change the way you move your arm to do things.
  • Physiotherapy exercises may improve the range of motion in your shoulder.
  • Nonsteroidal anti-inflammatory medications (NSAIDs), such as aspirin or ibuprofen, may reduce inflammation and pain.
  • Corticosteroid injections in the shoulder can dramatically reduce the inflammation and pain. However, the effect is often temporary.
  • Hyaluronic acid injections act like a lubricant and shock absorber and can be useful in shoulder arthritis and can be be repeated if useful.
  • Moist heat
  • Ice your shoulder for 20 to 30 minutes two or three times a day to reduce inflammation and ease pain.

Anatomical Shoulder replacement
In this surgery the humeral head (ball)
and glenoid (socket) are replaced with
metal and cemented plastic components.
(anatomical TSR picture)

When is a shoulder replacement necessary?


Generally, shoulder replacement is advisable when the symptoms of pain and stiffness are significantly interfering with quality of life. If you are getting sleep disturbance that is not eased by simple medication ait is time to think of surgery.


Surgery may be also a good option in patients where stiffness (loss of motion) is the min symptoms particularly if both shoulders are involved an it interferes with activities of daily living such as personal hygiene. It is probably better to replace the joint before the range of motion deteriorates too severely as the results are better if the shoulder hasn’t stiffened completely.


What shoulder conditions can be treated with a shoulder replacement?


A shoulder replacement is commonly performed where are the joint surfaces of the shoulder or damaged for example in osteoarthritis (‘wear-and-tear’ arthritis), rheumatoid arthritis or other types of arthritis. The joint surfaces may also be damaged as a result of an accident- post traumatic arthritis. Patients who have developed arthritis secondary to severe rotator cuff problems may also be a candidate for shoulder replacement surgery.


*This leaflet may be helpful – link to TSR leaflet


Are there different types shoulder replacements?

There are two main types of shoulder replacement

Reverse Geometry Shoulder replacement
This type of surgery is performed when
there is poor function of the rotator cuff
(internal muscles) or where there is a lot
of damage to the socket and an
anatomical replacement is not possible.
(reverse geometry TSR)

What is the Required Rehabilitation?

Anatomical Total Shoulder Replacement

Post Operative Guidelines –


Anatomical total shoulder arthroplasty is performed for patients who have end stage arthritis with an intact rotator cuff. The surgical approach involves a tenotomy of the subscapularis tendon which is subsequently repaired. It is important to protect the repair by avoiding loading the subscapularis by active internal rotation or excessive passive external rotation.


The given time frames are an approximate guide for progression, achieving the clinical criteria should guide the clinician and patient through this protocol.


Phase 1 – Joint protection


Aim to maintain integrity of joint while restoring passive range of motion.

  • Education of patient regarding post-operative precautions and importance of adherence to and compliance with rehabilitation programme
  • Allow healing of soft tissue
  • Protect the prosthesis
  • Reduce pain, inflammation and muscular inhibition
  • Achieve AAROM up to 90° flexion, 90° elevation in scapula plane


Precautions

  • Sling should be worn for 4 weeks. While sitting, keep the arm supported with a small pillow to prevent hyperextension.
  • Patients can use the arm below the elbow e.g. using computer, reading immediately following surgery
  • No lifting with the operated arm
  • Avoid excessive stretching or sudden movements
  • Avoid combined abduction and external rotation
  • Avoid excessive shoulder motion behind back, especially into internal rotation (IR)
  • No resisted Internal rotation
  • No weight bearing through operated arm e.g. getting out of a chair or when using walking aids.


Week 1-3


  • Educate patient in relation to timescales, precautions and sling management
  • Frequent cryotherapy for pain and inflammation
  • Introduce AROM elbow, wrist, hand exercises from day 1. Encourage light functional use of hand in sling.
  • Introduce Shoulder Active Assisted Range of Movement; flexion in supine to tolerance.
  • Introduce submaximal pain-free isometrics in scapular plane (<30% MVC) except IR
  • Periscapular submaximal pain-free isometrics in scapular plane


Week 4

  • Progress passive ROM as motion allows
  • Begin shoulder active assisted abduction, ER and IR in scapular plane
  • Ensure good scapular / glenohumeral dissociation. Correct abnormal movement patterns


Proceed to phase 2 if pain controlled, no signs of instability, no abnormal movement patterns, subscapularis integrity intact.


Phase 2 (approximately 4-8 weeks)

Goals

  • Aim to restore passive ROM
  • gradually restore active motion
  • Control pain and inflammation
  • Re-establish dynamic shoulder stability with good movement patterns


Intervention

  • Wean out of sling
  • Continue to observe precautions
  • While lying supine, a small pillow placed under the elbow will prevent shoulder hyperextension
  • Avoid lifting anything heavier than a cup
  • Avoid supporting body weight
  • Avoid sudden movements
  • In the presence of poor shoulder mechanics avoid repetitive AROM exercises / activity against gravity in standing
  • Continue with passive ROM, AAROM
  • Begin active flexion, IR, ER, abduction pain free ROM
  • AAROM pulleys (flexion and abduction)
  • Continue gentle isometrics (<30%) to include IR if pain free
  • If pain is controlled and good quality of movement may begin HBB (do not force)
  • Progression of scapular strengthening exercises
  • Encourage functional use of arm at waist height for light tasks Progress to phase III if pain free, well controlled functional AROM, good cuff (including subscapularis) and scapular function and good shoulder mechanics through available range.


Phase III


Goals

  • Gradual return to functional activities
  • Gradual restoration of strength, power and endurance
  • Ensure good shoulder mechanics and movement patterns


Precautions

  • Avoid heavy lifting
  • Avoid weightbearing through the operated arm
  • Avoid forced external rotation and combined abduction and external rotation and hand behind back
  • Avoid forced internal rotation against resistance


Interventions

  • Continue PROM as needed to maintain ROM
  • Introduce rotator cuff resistance exercises through range (including subscapularis from 8 weeks) progress as comfort permits
  • Consider deltoid rehab if poor cuff function
  • Regain external rotation ROM (do not force)
  • Enhance functional use of the upper limb
  • Include closed kinetic chain exercises if appropriate
  • Educate patient with regards long term management strategies


Functional Milestones

  • Driving depends on side and whether automatic generally after 4-6 weeks when patient has adequate control
  • Swimming 16 weeks
  • Golf 16 -20 weeks


References

Bullock GS, Garrigues GE, Ledbetter L, Kennedy J (2019) A systematic review of proposed rehabilitation guidelines following anatomical and reverse shoulder arthroplasty. Journal of Orthopaedic and Sports Physical Therapy 49(5) 337- 346

Wilcox RB, Arslanian LE, Millett PJ (2005) Jounal of Orthopaedic and Sports Physical Therapy 35(12) 821-836

Reverse Geometry Total Shoulder Replacement

Post Operative Guidelines –


Reverse Geometry Total Shoulder Replacement


Mr.Hannan Mullett ,Consultant Shoulder Surgeon


Reverse geometry total shoulder replacement is a reliable option for rotator cuff arthropathy, Irreparable massive rotator cuff tears,glenohumeral arthritis and for some post traumatic conditions. Patients generally can expect significant reduction in their pre-operative pain levels and a functional range of motion following recovery. Internal rotation may never recover fully given this type of prosthetic design .Given that the surgery is generally performed on patients with severe rotator cuff deficiency there is likely to be a chronic deficit in rotator cuff strength. Improvement can continue for 18-24 months post-operatively .


Goals

  • Protect surgical soft tissue repair.
  • Avoid dislocation in the early post-operative period. In fact with the current generation of prosthesis the risk of dislocation with primary surgery is very low. It is higher in the revision setting. Mr. Mullett will advise if there is a higher rate of dislocation otherwise the risk is very low Gentle stretching and regaining range of motion.
  • Gentle strengthening


Immobolisation

  • Patients generally wear a sling for 4 week period
  • Patients can use the arm below the elbow e.g. using computer, reading immediately following surgery


0-6 weeks

  • Pendular exercises, active assisted ER to 30°
  • Active assisted elevation as comfort allows
  • Consider use of table slides
  • avoiding forced internal rotation (v small risk dislocation)


6-8 weeks

  • Gradually increase ER
  • As ER increases gradually increase elevation ROM
  • Active assisted exercises progressing to active exercises-utilise short lever, supine and closed kinetic chain-avoid long lever open chain exercises until 12 weeks


12 weeks +

  • Isometrics in variable starting positions progressing to resisted through range strengthening
  • Advance proprioceptive and dynamic neuromuscular control retraining


Functional Milestones

  • Driving -depends on side and whether automatic generally after 4-6 weeks when patient has adequate control
  • Swimming 16 weeks
  • Golf 16 -20. weeks
  • Light work (sedentary) 6-8 weeks

Detailed Anatomy of the shoulder

Bones & Joints

The shoulder is made of up 3 bones that interact together to for a supporting structure for the upper limb. We refer to this grouping of bones as “the shoulder girdle”. The bones of the shoulder girdle are;


  • The Humerus – the upper arm bone with the ‘humeral head’ (the ball of the shoulder joint) on the top end
  • The Scapula – the shoulder blade. There a number of parts to the scapula.
  • the ‘glenoid’ (the socket of the shoulder joint)
  • the ‘acromion’ (which covers the top of the glenohumeral joint and attaches the scapula to the clavicle)
  • the ‘coracoid’ (a bony ridge at the front of the scapular to which a number of ligaments and muscles attach)
  • The Clavicle – the collar bone which connects the acromion part of the scapula to the sternum (the breast bone) ‘strutting’ the shoulder out. This is the only direct bone connection that the shoulder girdle has with the rest of the skeleton.


Where a bone come into contact with another is known as a joint. The joints of the shoulder are;


  • The Glenohumeral Joint – formed between the humeral head (ball) and the glenoid (socket).
  • The Acromioclavicular Joint – the joint that connects the scapula to the outer end of the clavicle
  • The Sternoclavicular Joint- the joint that connects the inner end of the clavicle to sternum. This is the only bony connection between the ‘shoulder girdle’ and the main the skeleton
  • The Scapulothoracic Joint – this joint involves the movement of the scapula over the ribs at the back of the chest. This is a ‘psuedo’ joint (not a real joint as it does not have any articular cartilage.
Capsule and Ligaments


The tissue components within the Shoulder Joint itself;


  • The Glenoid Labrum – this is a ‘rim’ of tissue that goes around the outer edge of the glenoid, the tendon of the long head of biceps attaches to the top part of the labrum. The labrum effectively deepens the glenoid socket which helps to increase the stability of the humeral head. It works a bit like a ‘chock’ under a wheel preventing the head from ‘rolling’ over the edge.
  • The Joint Capsule – this is a watertight sac that surrounds the joint. It is formed circumferentially from around the base of the glenoid socket and passes outwards to join circumferentially around the neck of the humeral head. The inner lining of the sac is covered with synovial tissue which produces synovial fluid that lubricates the joint and provides joint nutrition.


The bones and joint of the shoulder are held in position by strips of very strong tissue, known as ligaments. They attach bone to bone where as a tendon attaches muscle to bone. The main ligaments of the shoulder girdle are:


  • The Glenohumeral Ligaments (GHL)– within the joint capsule there are 4 strong ligaments that connect the glenoid to the humerus. These are the main structures that keep the shoulder in place and stop it from dislocating. There are 3 ligaments at the front (Superior, Middle & Anterior Inferior Glenohumeral Ligaments) and 1 ligament at the back of the joint (Posterior Inferior Glenohumeral Ligament).
  • The CoracoAcromial Ligament (CAL) – this ligament connects the acromion to the coracoid forming a tunnel. The Rotator Cuff tendons pass under this tunnel. In some circumstances the tip of the acromion and the ligament can thicken and cause Impingement to the tendons as they run underneath
  • The Acromioclavicular Ligaments (ACL) – these are short ligaments that attach the clavicle to the acromion within the acromioclavicular joint (AC jt)
  • The Coracoclavicular Ligaments (CCL) – these are 2 ligaments that connect the clavicle to the coracoid. They help to supply additional stability to the clavicle and the ACjt.
Rotator Cuff


The Rotator Cuff

This refers to a group of muscles that hold the head of the upper arm into the socket of the shoulder. These muscles all insert into the bone as tendons so we often refer to the structure as the rotator cuff tendons. This layer lies on top of the bones and connective tissue.


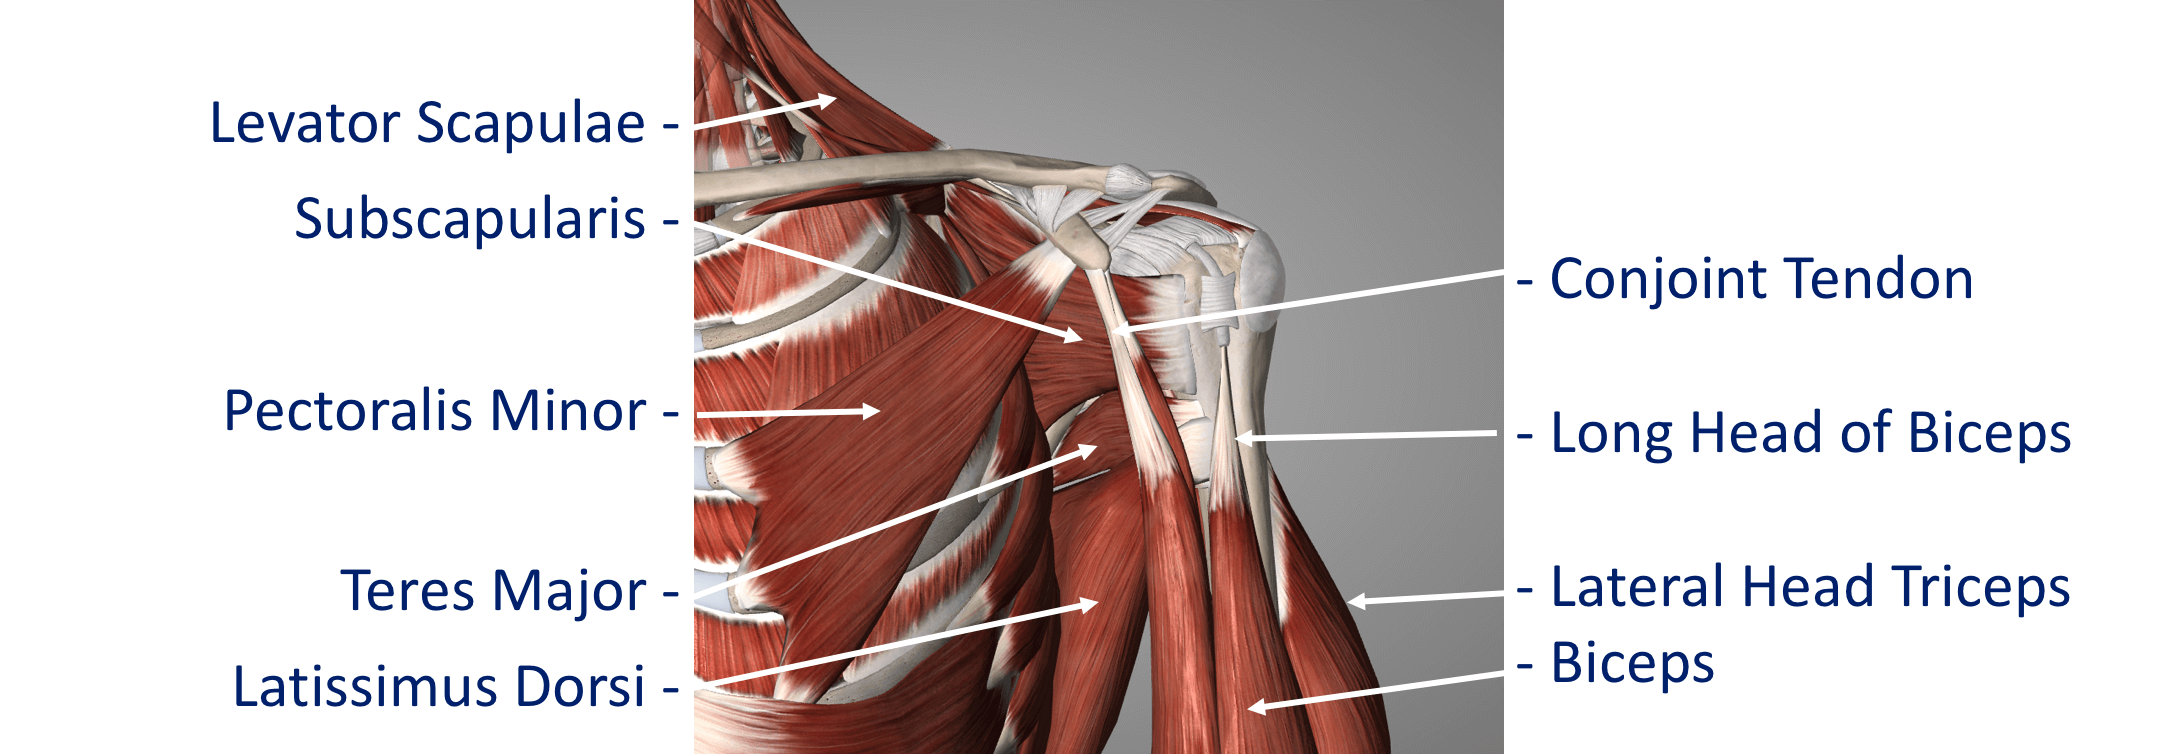
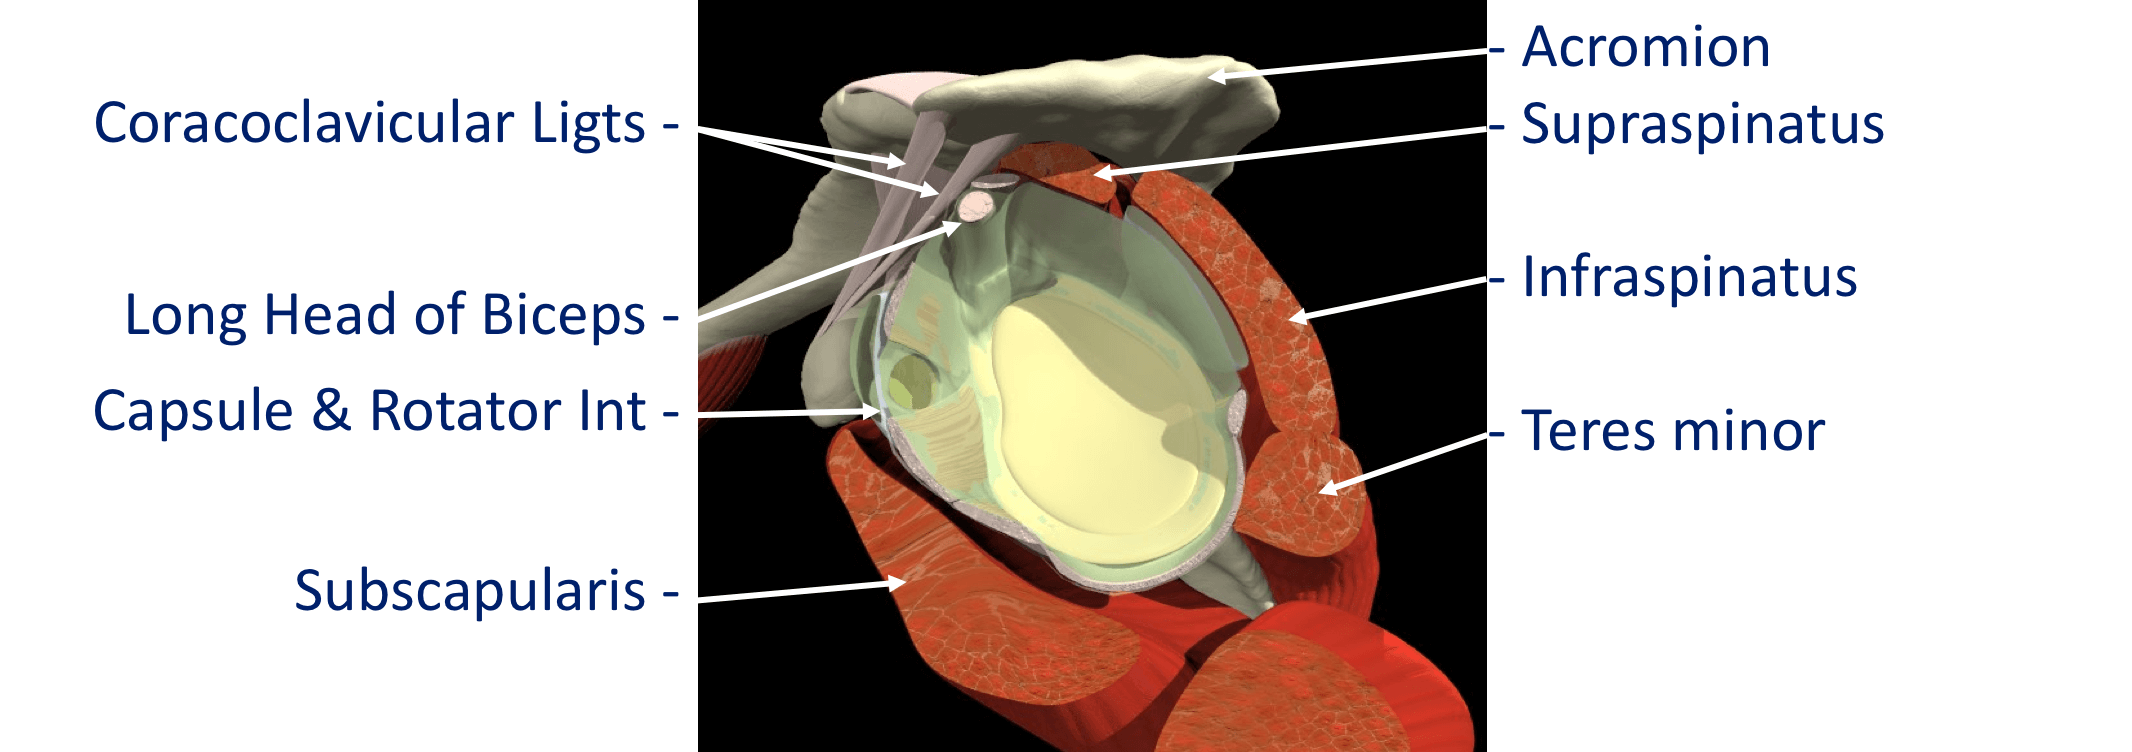
The Rotator Cuff Tendons – this is formed by a group of 4 tendons that connect the deepest layer of 4 muscles to the humerus. These muscles are,


  • Subscapularis
  • Supraspinatus
  • Infraspinatus
  • Teres Minor


The muscles surround the shoulder and as their 4 tendons pass over the joint they converge together. As these bands of tissue attach onto the humerus they blend together and form a ‘tendon cuff’. This is known as the Rotator Cuff


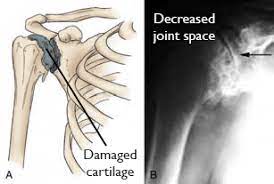
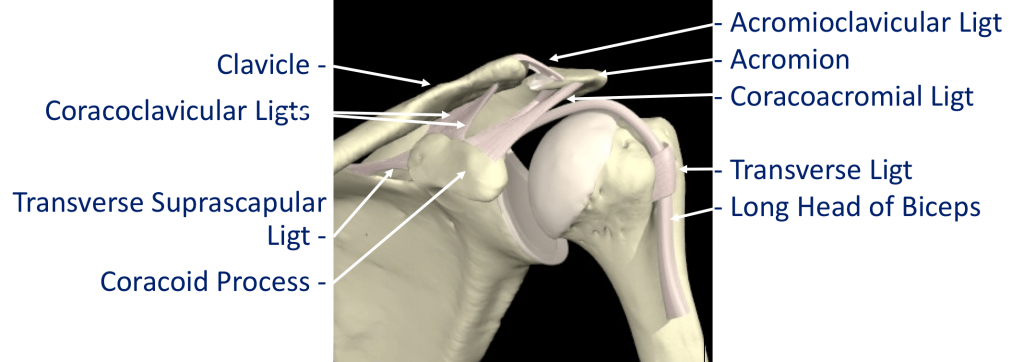
The Biceps Tendon – the Biceps muscle, on the front of the arm, is formed from 2 tendons; the long head and short head. The Long Head of Biceps tendon begins at the top of the glenoid (with the labrum) and passes out through the shoulder joint to connect to the biceps muscle. The Rotator Cuff tendons and the Long Head of Biceps tendon are positioned very close to each other and are often both affected by injury at the same time. The Rotator Cuff tendons pass underneath the acromion through the Subacromial Space as they insert into the humerus (Fig 9). The narrow ‘clearance space’ underneath the acromion is the commonest place for Rotator Cuff problems to occur.


Additional supporting muscles

There are a large number of muscles around the shoulder which are responsible for moving, stabilising and supporting the shoulder girdle. The muscles can be divided into 4 groups.


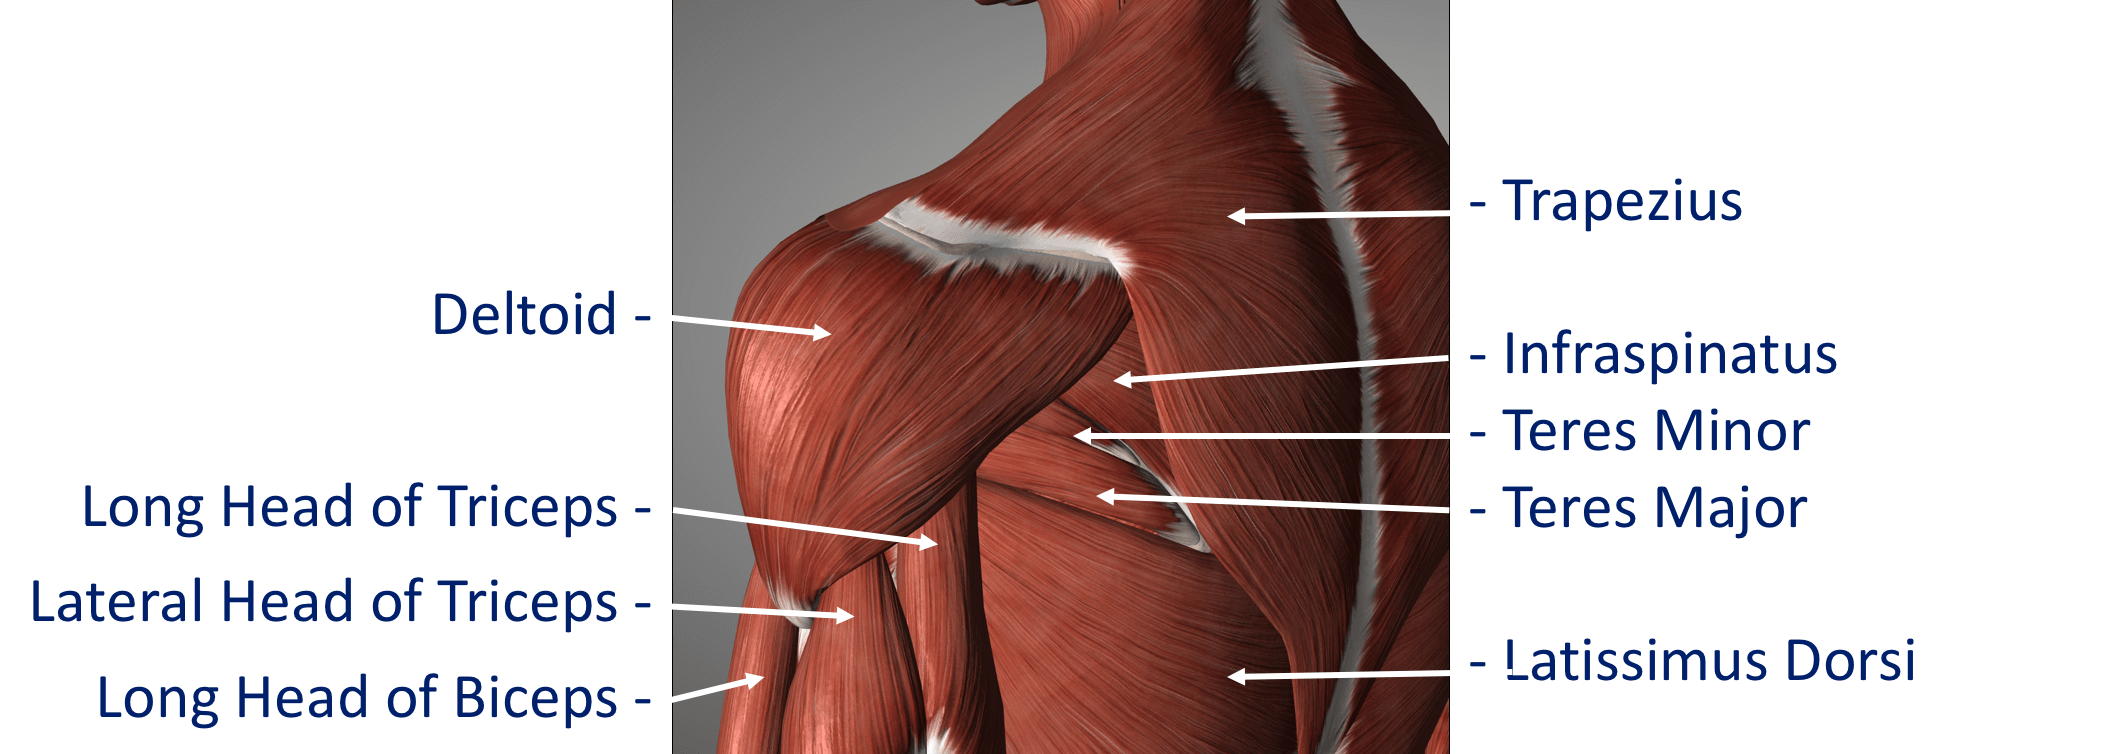
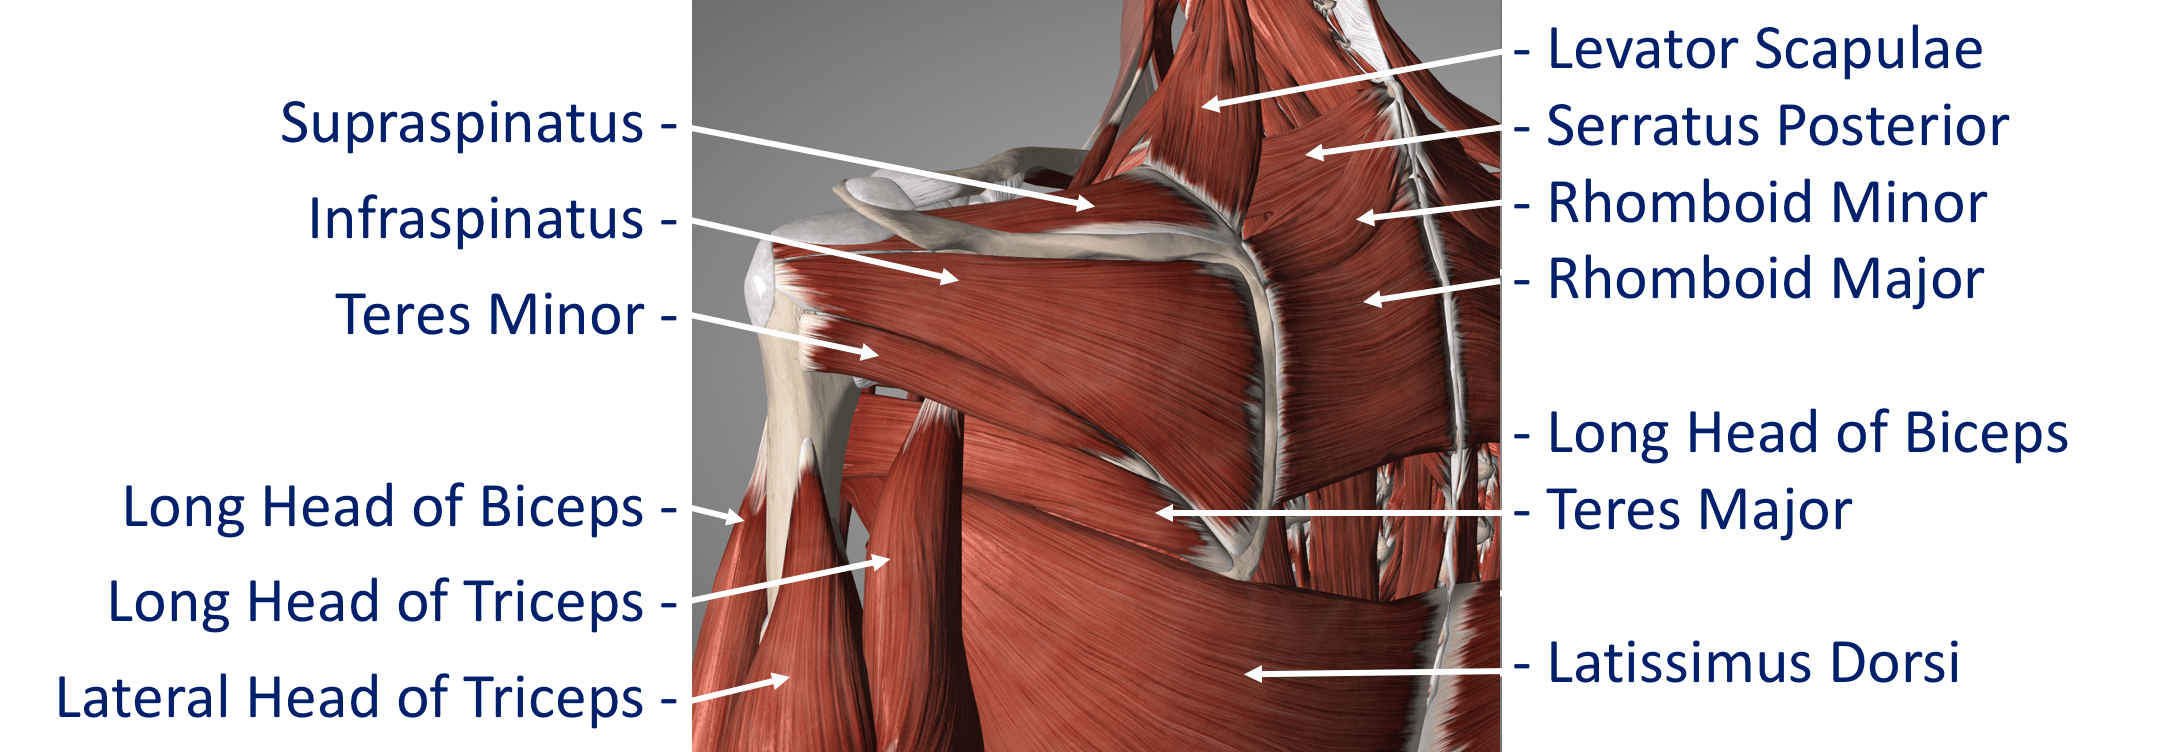
Deep Muscles (Intrinsic / Rotator Cuff Muscles) – these are the 4 muscles mentioned earlier whose tendons form the rotator cuff. The muscles all arise from the blade (flat surface) of the scapula and pass over the shoulder joint with the tendons attaching onto the humerus.


  • Subscapularis
  • Supraspinatus
  • Infraspinatus


Teres Minor These muscles often function as a group and are involved in raising, rotating and moving the shoulder in many directions. The combined pull of the Rotator Cuff muscles also pulls the humeral head into the socket of the glenoid helping to stabilise the glenohumeral joint.


Intermediate Muscles – These muscles provide additional stability and strength to the glenohumeral joint and the shoulder girdle.


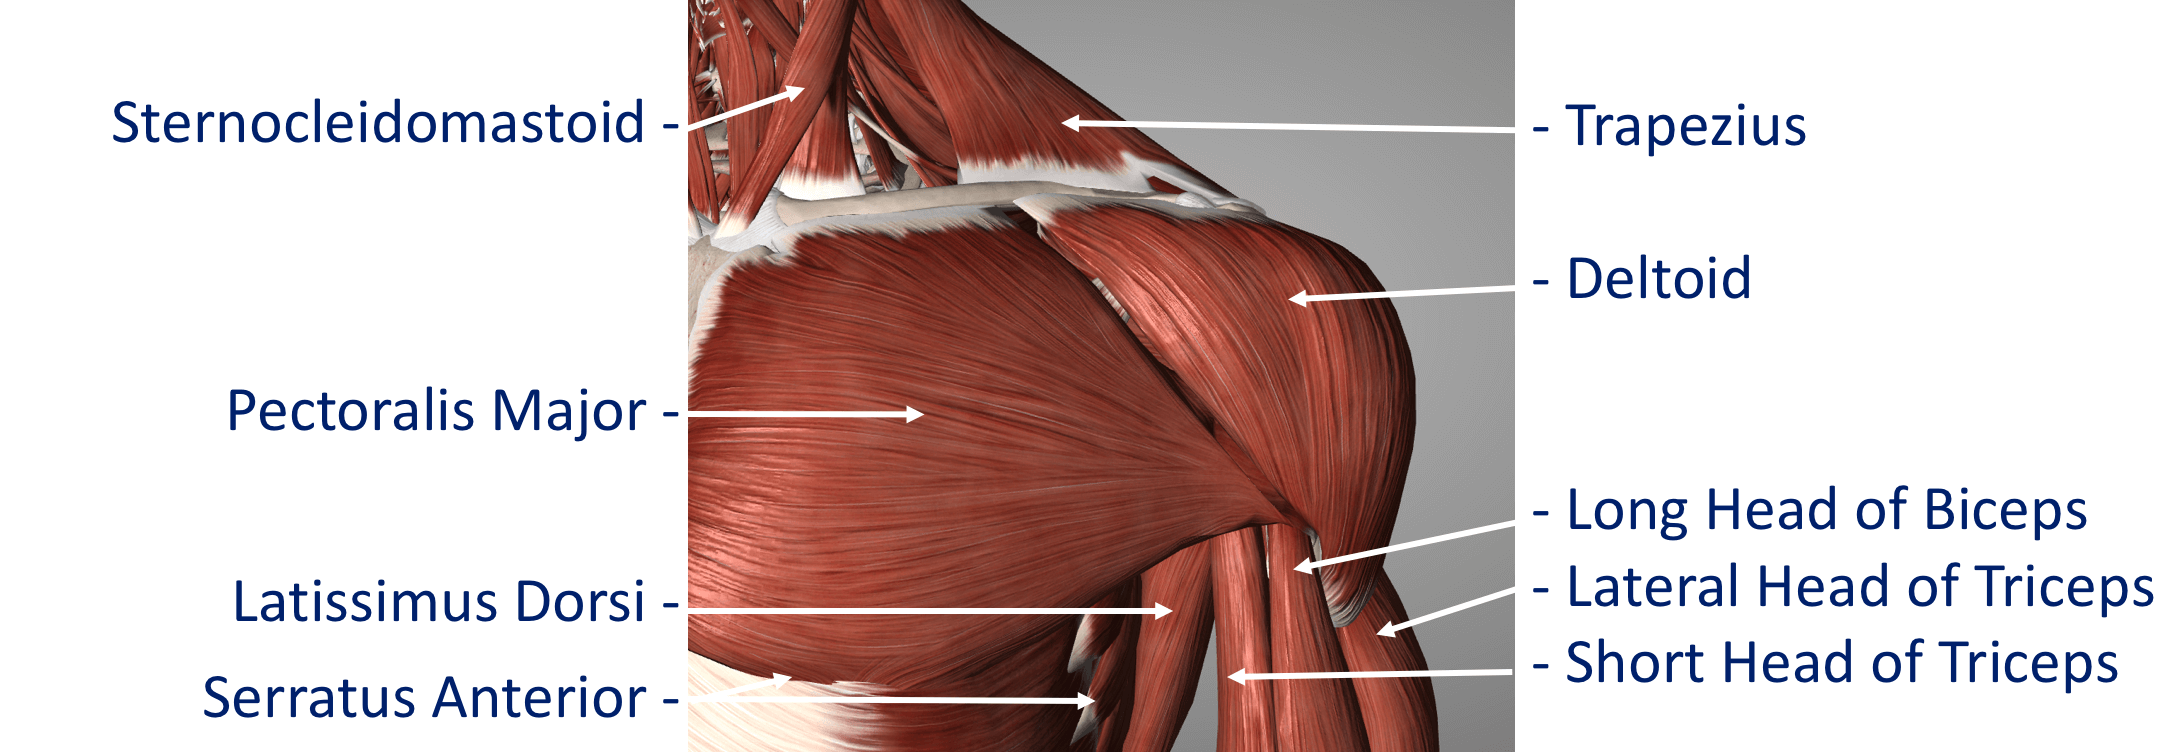
Superficial Muscles (Extrinsic) – These are the large muscles that can be seen around the shoulder externally and provide strength and powerful movements. • Deltoid – this is the large muscle over the top and the front of the shoulder which provides the power to lift the shoulder after the rotator cuff muscles have begun the movement


Pectoralis Major – this is the large muscle over the front of the chest.


Biceps – this is the powerful muscle over the front of the upper arm that flexes the elbow. One of the Biceps tendons (the Long Head) arise from within the shoulder joint. Problems can occur with the stability of the Shoulder if the sequential rhythm in which these muscles contract to move the shoulder is disturbed


Back Muscles (Posterior) – these muscles are involved in suspending the scapula onto the back of the chest wall, stabilising the scapula and moving the scapula over the chest wall (scapulothoracic joint). A number of these muscles, including trapezius, levator scapulae and the rhomboids, originate from the vertebrae of the cervical and thoracic spine. Problems can occur with the smooth movement of the scapula over the chest wall if these muscles are weakened or are not working properly.