Shoulder Conditions
Sports Injuries & Instability
-
Scroll Down
 Scroll Down
Shoulder Conditions
Sports Injuries & Instability
-
Scroll Down
 Scroll Down
Shoulder Conditions
Sports Injuries & Instability
-
Scroll Down
 Scroll Down
Shoulder Conditions
Sports Injuries & Instability
-
Scroll Down
 Scroll Down
Shoulder Sporting Injuries
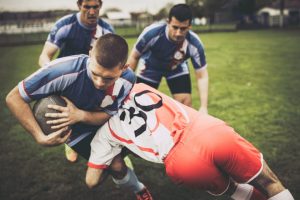
Shoulder injuries are common particularly in collision sports such as GAA football, hurling and rugby. Common sporting injuries of the shoulder include shoulder dislocations,AC joint injuries ,Rotator cuff Tears,Biceps Injuries and labral tears.The shoulder (ball & socket joint) is very mobile allowing great range of motion but because of this can either partially dislocate (subluxation) or fully dislocate. The damaged structures don’t tend to repair and this leads to a high rate of repeated subluxations or dislocations. Surgical reconstruction eith through arthroscopic (key-hole) or Open surgery can significantly reduce the likelihood of further instability .
- Sports Injuries & Instability
- A Patient’s Experience
- How did I dislocate my shoulder?
- Treatment options available
- What is the Required Rehabilitation?
- Detailed Anatomy of the shoulder
- Patient Booklet
- Latarjet
- Arthroscopic Stabilisation
A Patient’s Experience
An x-ray in the local emergency department confirmed what the physiotherapist had suspected- an anterior dislocation of the shoulder. The doctors had to use sedation in a drip to allow them to put the shoulder back in joint and afterwards the x-ray showed the shoulder was back in position. He was more comfortable now and the sling allowed him to rest the injured joint.
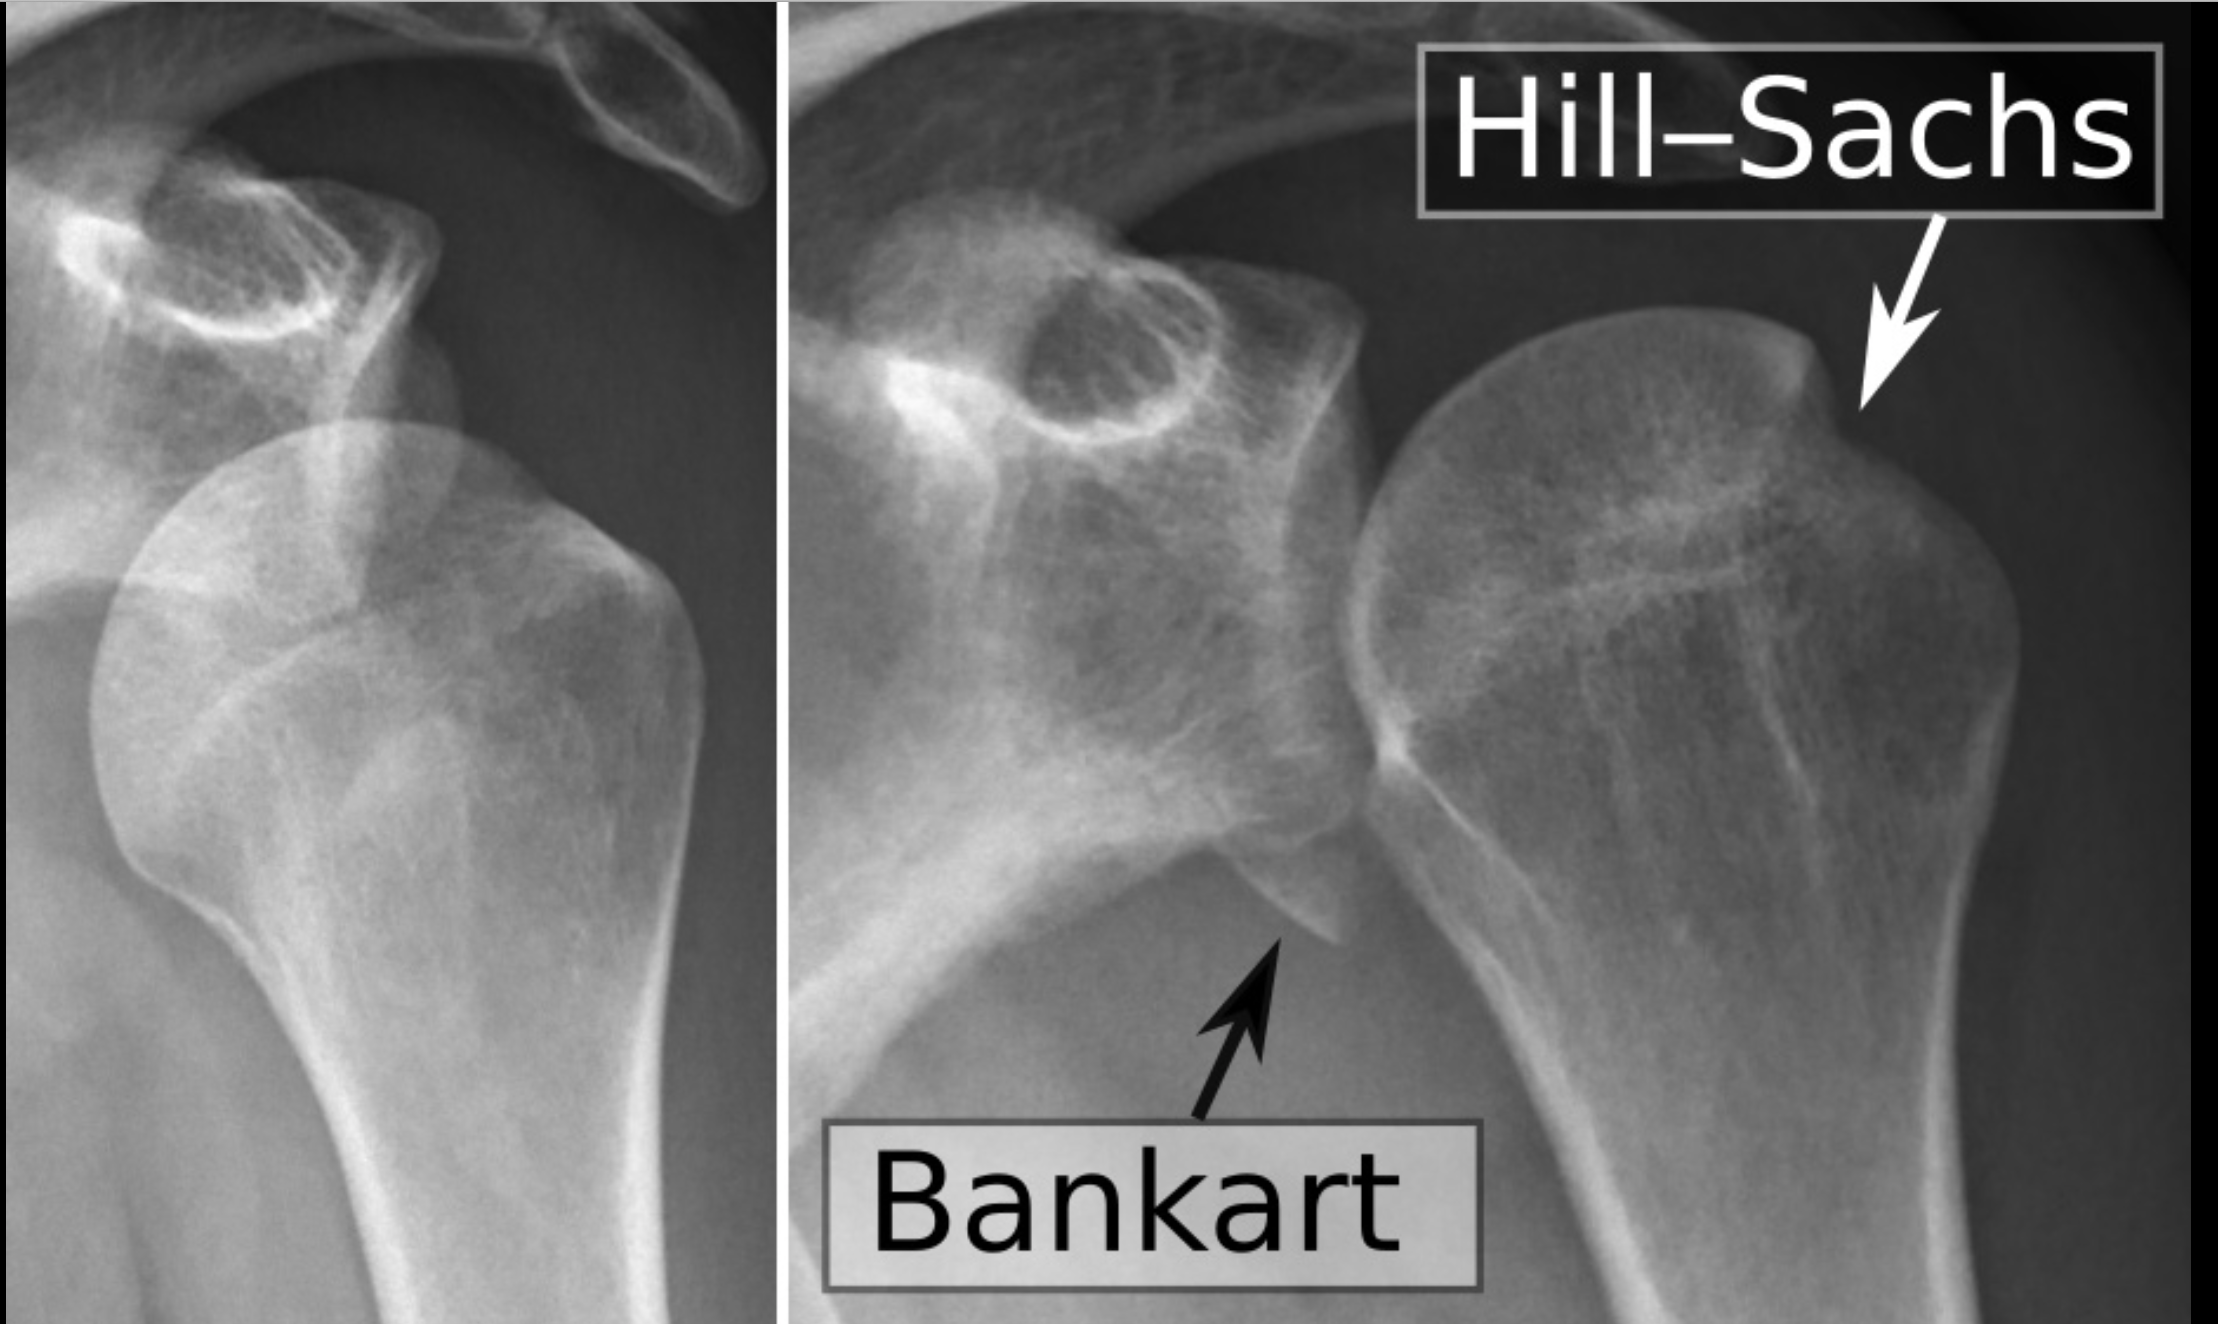
His physiotherapist made contact with Mr. Mullett at SSC and his team arranged an MRI scan which showed typical findings after a shoulder dislocation; a torn labrum (ligament surrounding socket) and a damage to the ball (Hill Sachs lesion).
Mr. Mullett examined Sean’s shoulder in his clinic in Santry and reviewed the images. He then explained the options.
The risk of further dislocation was very high in a young footballer and given the damage obvious on the scan and the fact that the season was nearly finished surgery was recommended.
As Sean had had only one dislocation and there was not too much bone damage to the socket (bony Bankart) Mr. Mullett recommended arthroscopic surgery (keyhole surgery).
The surgery was performed under general anaesthetic at the sports surgery clinic. Three small keyhole incisions were used. Mr. Mullett put a small camera (arthroscope) into the shoulder joint and confirmed the damage seen on the MRI scan. He used 4-5 bioabsorbable anchors, (little non-metal screws with stitching threads attached) and stitched down the torn labrum.
The surgery went well and Sean stayed one night in hospital. He was immediately able to use his arm to do simple activities such as brushing his teeth, eating meals and using his phone and laptop. The wounds were covered with waterproof dressing so he could also shower immediately. He wore the sling for 3 weeks but was able to take it off when he was at his desk and was able to work from home after the first few days.
He saw Mr. Mullett for a post-operative visit at two weeks following the surgery and he went through the operation and the pictures from the arthroscopic surgery and the repair. The wounds had healed completely. He was given a referral and protocol for his physiotherapist. His physiotherapist began rehabilitation and Sean was very diligent in his home exercise program as he was keen to get back to sport as soon as possible. At 3 months following surgery he visited the sports medicine department at SSC and had isokinetic testing done which identified some areas for his physio to “fine-tune”.
He had a further review with Mr. Mullett who was delighted that he had almost full range of motion and his shoulder felt very stable. Sean went back training full contact and though a little nervous to begin with he soon got his confidence back and was soon back to lead his team out to win in a county final.
A Patient’s Experience

An x-ray in the local emergency department confirmed what the physiotherapist had suspected- an anterior dislocation of the shoulder. The doctors had to use sedation in a drip to allow them to put the shoulder back in joint and afterwards the x-ray showed the shoulder was back in position. He was more comfortable now and the sling allowed him to rest the injured joint.
His physiotherapist made contact with Mr. Mullett at SSC and his team arranged an MRI scan which showed typical findings after a shoulder dislocation; a torn labrum (ligament surrounding socket) and a damage to the ball (Hill Sachs lesion).
Mr. Mullett examined Sean’s shoulder in his clinic in Santry and reviewed the images. He then explained the options.
The risk of further dislocation was very high in a young footballer and given the damage obvious on the scan and the fact that the season was nearly finished surgery was recommended.
As Sean had had only one dislocation and there was not too much bone damage to the socket (bony Bankart) Mr. Mullett recommended arthroscopic surgery (keyhole surgery).
The surgery was performed under general anaesthetic at the sports surgery clinic. Three small keyhole incisions were used. Mr. Mullett put a small camera (arthroscope) into the shoulder joint and confirmed the damage seen on the MRI scan. He used 4-5 bioabsorbable anchors, (little non-metal screws with stitching threads attached) and stitched down the torn labrum.
The surgery went well and Sean stayed one night in hospital. He was immediately able to use his arm to do simple activities such as brushing his teeth, eating meals and using his phone and laptop. The wounds were covered with waterproof dressing so he could also shower immediately. He wore the sling for 3 weeks but was able to take it off when he was at his desk and was able to work from home after the first few days.
He saw Mr. Mullett for a post-operative visit at two weeks following the surgery and he went through the operation and the pictures from the arthroscopic surgery and the repair. The wounds had healed completely. He was given a referral and protocol for his physiotherapist. His physiotherapist began rehabilitation and Sean was very diligent in his home exercise program as he was keen to get back to sport as soon as possible. At 3 months following surgery he visited the sports medicine department at SSC and had isokinetic testing done which identified some areas for his physio to “fine-tune”.
He had a further review with Mr. Mullett who was delighted that he had almost full range of motion and his shoulder felt very stable. Sean went back training full contact and though a little nervous to begin with he soon got his confidence back and was soon back to lead his team out to win in a county final.
How did I dislocate my shoulder?
Dislocations of the shoulder are one of the most common injuries to the shoulder, especially in younger athletes and those who participate in contact sports.
The shoulder joint is the most frequently dislocated joint of the body. Certain individuals are inherently “loose” or lax in their shoulders, which may place them at greater risk of instability.
The shoulder joint (gleno-humeral joint) is structured as a “ball-in-socket” joint. This allows for extreme ranges of motion. However due to the high mobility of the human shoulder joint and the fact that the socket is shallow there is a risk of shoulder dislocating ( shoulder instability). *for more information see anatomy dropdown above
Since the socket is shallow, the shoulder relies on the soft tissue around the shoulder for stability. The labrum, a thickened cartilage layer around the glenoid, ligaments and capsule, provide most of the stability to the shoulder. The muscles of the rotator cuff and scapula also provide stability. Because it moves in several directions, your shoulder can dislocate forward, backward or downward, completely or partially, though most dislocations occur through the front of the shoulder ( anterior dislocation ) . In addition, ligaments that maintain the ball (humeral head) in the socket ( glenoid) can be torn or stretched, often complicating the dislocation and make further dislocations more likely.
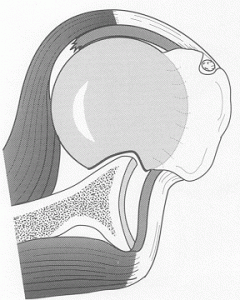
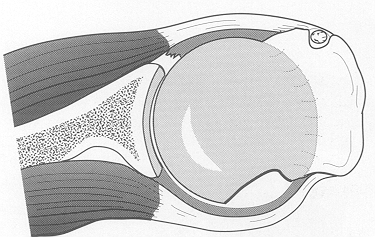
The shoulder is most commonly dislocated when the arm is abducted and externally rotated, in a position as if you were throwing a ball. When there is a strong force with the arm in this position, the humeral head can dislocate out the front of the glenoid. When this occurs, it can either come partially out, which is termed a shoulder subluxation, or come entirely out, which is termed a shoulder dislocation. Although some people are able to reduce their shoulder themselves (put it back into joint), many others need to have their shoulder reduced in an emergency department mostly due to excessive surrounding muscle spasm. Patients who play contact sports such as GAA football or hurling or rugby are at higher risk of shoulder instability due to the collision nature of these sports. Male players are at a higher risk of shoulder instability. Some athletes have extra mobility of their joints (hyperlaxity) . This generally is a good thing as it can confer an athletic advantage but comes at an increased risk of joint dislocations including the shoulder joint.
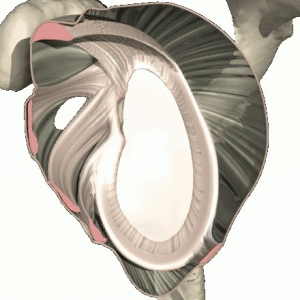
“Diagram shows labreal tear”
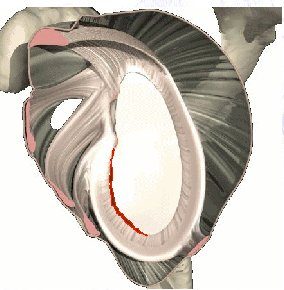
In the most severe example, the glenohumeral joint dislocates, meaning the ball completely separates from the socket. The ball needs to be relocated into the joint either on the pitch by a physio or doctor or if this is not available or it is not possible the player will need to attend the hospital to have it put back in (reduced) under sedation or occasionally under a full anaesthetic. After a first dislocation it is advisable to have an x-ray to ensure the shoulder is back in joint and there are no associated fractures/broken bones. It is also advisable to immobilise the shoulder in a sling for a number of weeks for comfort. Often sedation or anaesthesia is required to reduce a dislocation and pain relieving medications are required for the next few days. We would recommend a medical assessment, including an x-ray of the shoulder, be required in all cases. Associated injury to bone, the cartilage of the shoulder (labrum), the lining of the shoulder (capsule) or surrounding muscles (rotator cuff) and nerves may complicate the injury and require further investigations. As a result; we would also recommend an MRI/Arthrogram after an instability episode, to assess the damage to the joint. This finer detail cannot be easily seen on x-rays.
If the shoulder pops out but pops back in without medical intervention it is called a subluxation (partial dislocation). This is still considered a type of shoulder instability.
In some players the shoulder doesn’t dislocate or subluxate but the player has pain with impact particularly when the arm is extended. This may be accompanied by loss of power ,numbness or tingling . This is sometimes called a stinger.
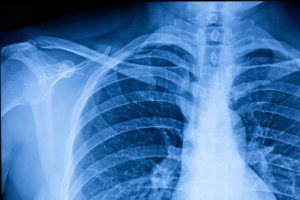
The best scan for shoulder instability is an MRI scan where die is injected into the shoulder (MR arthrogram). If there has been a recent dislocation, within the last 10 days, a plain scan with-out the dye, a non-contrast scan, may be sufficient. Our team can help in arranging the appropriate scans.
Treatment options available
Surgery is often required to treat shoulder instability. The surgery depends on the extent of the damage and future physical demands on the shoulder. However, if the patient is active and there is significant damage to the structures of the shoulder, a surgical reconstruction is recommended. This may be done either arthroscopically (minimally invasive surgery/ ”keyhole”) or through an open incision. In those less-active patients who have little structural damage to the shoulder, physical therapy can help stabilize the shoulder without resorting to surgery in many cases
*for more information on our physiotherapy rehab protocols and non-operative management advice click here
It should be noted that with every subsequent dislocation further damage can be done to the shoulder joint and this predisposes you to osteoarthritis in the future.
The factors that influence whether surgery is recommended depend on the age of the patient, sports played, position in sports, number of either subluxations or dislocations, examination and findings on MRI scan. Despite advances in rehabilitation, strengthening and physiotherapy, the recurrence rate for shoulder instability is high (over 90% recurrence in 20-year-old males). That recurrence rate is far higher in those persons with bony and cartilage damage than those without.
Generally, in the young athletic population surgery is recommended as there is a high rate of further dislocations. If the patient has further dislocations more damage can be caused require a more extensive surgery. In the younger Athlete we may try and defer surgery until the patient is a little older and the body is more mature as surgery is more successful in the later teenage years and beyond. However even in the younger athlete, surgery may be preferable to multiple dislocations.
Arthroscopic Stabilisation (Keyhole procedure)
Arthroscopic stabilisation is a minimally invasive surgical procedure where the unstable shoulder joint is repaired through small “keyhole” incisions. The surgery is performed under general anaesthetic. Initially when asleep, your shoulder will be examined under anaesthetic, this allows us to assess the natural bony stability and laxity when the actions of muscle spasms are removed by the anaesthetic. Then, through a small 3mmm incision, a small camera will be inserted into the shoulder joint to confirm the amount of damage (labral tear) that was seen on your scans but also this allows us to check for any other, unseen or new damage, not on the scans to the bones and ligaments. A salt water fluid called saline is passed into the shoulder to allow us to better see the structures within it.
The area of bone where are the labrum has become detached is freshened and the anchors are inserted through additional small incisions. The anchors are made of a bioabsorbable (dissolvable) material, which is absorbed by the body after several months when the labrum has healed. Sutures (which are attached to the anchors) are passed around the torn labrum. When the sutures are tightened the labrum is firmly attached to the prepared bone allowing healing to take place. ( see figure x ).
The surgery can be accomplished using a number of these small, 3 mm incisions which generally heal well and are cosmetically pleasing.
Occasionally, if the degree of damage found at the time of the arthroscopy is greater than was demonstrated on the MRI scan or if the tissue quality is poor it may be necessary to convert to an open procedure which generally can be performed under the same general anaesthetic.
After surgery the wounds are covered with waterproof dressing so you can shower. You can use the arm below the elbow normally and generally use the shoulder enough to allow you to brush your teeth, use mobile phone and computer. The simple sling is easily removed for dressing. The sling is generally worn for three weeks. Patients who work in sedentary roles i.e. office based can generally return to work after one week.
Latarjet Guide Latarjet Procedure – Open Shoulder Stabilisation Surgery
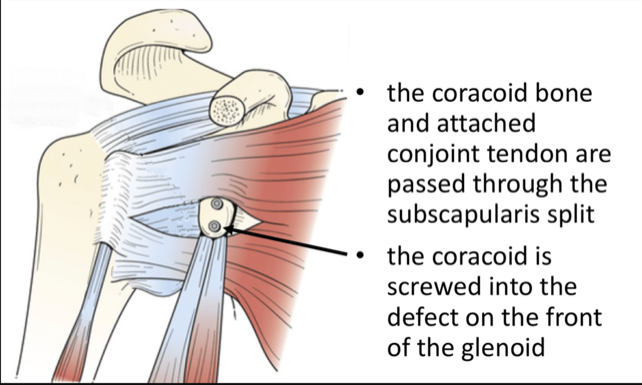
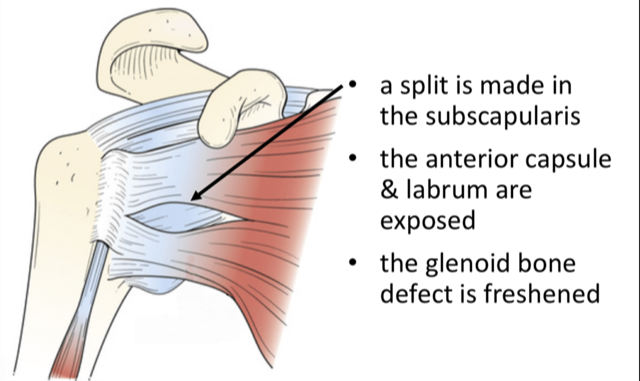
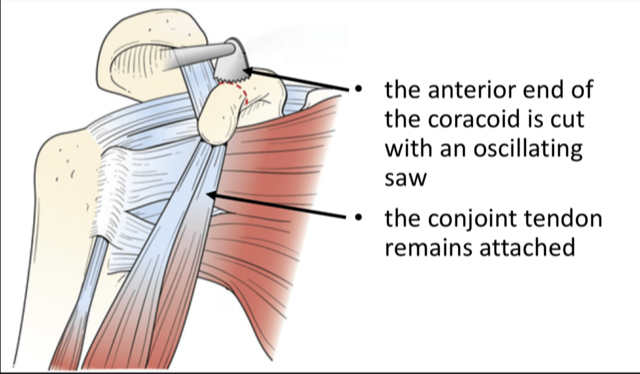
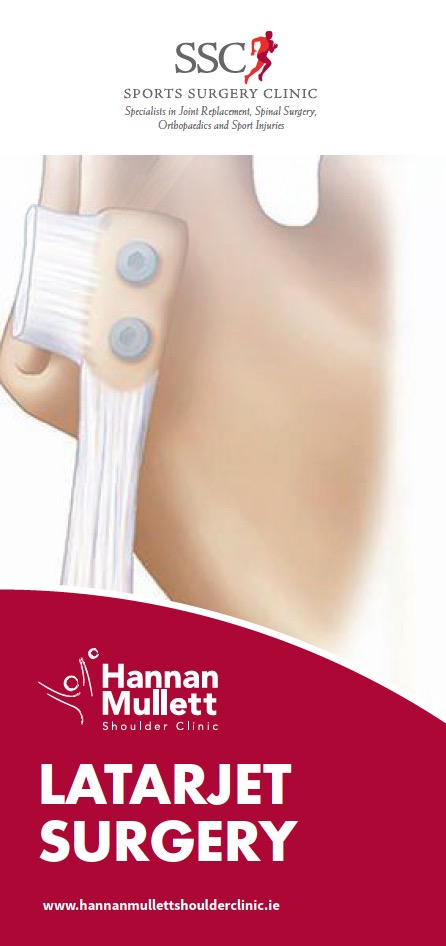
The Latarjet procedure is an operation to treat patients who have shoulder instability. It is often used in patients who play collision sports ,typically GAA or Rugby , who have sustained damage to the shoulder socket (glenoid) or the ball ( humeral head) and have a high rate of dislocation .It has been used for many years and has the lowest failure rate of instability procedures particularly in patients who have sustained bone damage.
The surgery Itself:
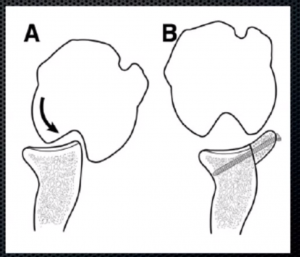
The operation generally involves a single night in hospital and is performed under general anaesthetic. Your shoulder is always examined at the start of the case while the you are under anaethetic to assess the true instability while the muscles are all relaxed from the anaesthetic. Then a small 3mm incision is made at the back of the shoulder and the shoulder is inspected with a small camera (arthroscopy) to confirm the amount of bone damage seen on the scans and check for other potential injuries to the shoulder joint. A larger second incision is made over the front of the shoulder (approximately 6cm in length). The shoulder joint is exposed and the bony fragment from the socket is removed. The corocoid bone is carefully cut, prepared and shaped and attached to the shoulder joint socket using two metal screws. These are made of a titanium alloy, are biologically inert and do not need to be removed. The wound is closed with dissolvable sutures and covered with a waterproof dressing which allows showering. You can use their arm immediately for activities such as using phone and laptop, washing teeth and personal hygiene. A physiotherapist will give you, the patient, some simple exercises before you leave the hospital.
Post-Operative Rehabilitation
A simple sling is worn for a 3-week period. We can advise about return to driving which is generally at three weeks. *click here for NDL driving advice Six weeks – The patient may use the whole arm, including shoulder, for light activity. Eight weeks– The patient may begin unrestricted, active use of the arm and shoulder. Three months – Most patients are reasonably comfortable, have a range-of-motion about half of what is normal, and experience some weakness. Six months – Most patients are pain-free (although they may experience pain during certain weather conditions), and have motion and strength which is returning to that of a normal level. *for more information see the physiotherapy section here
Complications
The surgery is successful in approximately 95% of patients. The surgery is performed under general anaesthetic, which brings its own set of comlications.Specific to the latarjet; here is a small risk (<1%) of damage to nerves or blood vessels , infection or bleeding (haematoma)- which rarely needs a further operation. A small proportion of patients (<5%) develop recurrent instability following the procedure. Some patients have persistent discomfort which generally improves with time. *click here for link to long term outcomes latarjet 10 years paper
Post-operative follow-up
The first post-operative visit is generally around 2-3 weeks. We will check the wound and discuss the procedure and give a physiotherapy referral and a post opartive rehabilitation protocol. At four months a final review with x-ray is scheduled. Our team, in conjunction with the treating physiotherapist will be able to advise on return to training, contact and play.
Large Tear Rehab Protocol
Rehabilitation Guidelines: Arthroscopic Shoulder stabilisation
Mr. Hannan Mullett, Consultant Shoulder Surgeon
Arthroscopic shoulder stabilisation is a common procedure to restore shoulder stability in patients with capsulolabral avulsions without substantial bone loss.
These guidelines are designed to aid the therapist treating the patient who had an arthroscopic stabilisation procedure.
Rehabilitation considerations
Reassurance and support regarding the injury and the rehabilitation process has an impact in successful return to play following shoulder stabilisation. It is important to ascertain any fears associated with the shoulder instability and educate the patient accordingly to optimize outcome.
Phase I (Weeks 0-4)
Goals:
- Protect the integrity of the surgical repair and optimize tissue healing
- Minimise shoulder pain and inflammatory response
- Gradual restoration of passive range of motion
- Enhance scapular stability
- Prevent compensatory movement patterns that may compromise recovery
Rehabilitation
- The sling is worn for 3-4 weeks to relieve pain and to protect the repair and avoid the arm being accidently knocked into risk positions. The sling can be removed to allow axillary hygiene and rehab.
- In patients who present with high pain levels and, or lack neutral rotation at 2 weeks post-surgery, it is important to remove the sling at this stage
- Can wean out of sling after 3 weeks if comfortable
- It is important to be aware to the ‘safe zone’ from the post-operative notes. The ‘safe zone’ positions are areas in space where it is safe to move the surgical arm, preventing significant stress on the surgical repair or injury (Funk, 2016). Generally, this is movement anterior to the scapula plane below 120 of elevation. Do not push into pain.
- Avoid combined abduction and external rotation
- Avoid forced end range mobilization especially external rotation with arm in neutral.
- Elbow/wrist/Hand range of motion and grip strengthening
- Begin shoulder active assisted / active supported range of motion (do not force any painful motion) within the safe zone.
- Rotator cuff / Scapula muscle facilitation exercises. Note that the patient requires adequate rotational range of motion before introducing active, through range cuff facilitation work above 90.
- Incorporate kinetic chain
- Heat/Ice before and after PT sessions.
Phase II. (Weeks 4-10)
Goals
- Protect integrity of the surgical repair
- Restoration functional range of motion
- Cuff recruitment and scapula control through range
- Re-educate and enhance proprioceptive acuity
Rehabilitation
Avoid passive stretching into combined abduction / external rotation. Can encourage active movement into this position provided the patient demonstrates good control and does not report apprehension.
- Progress cuff and scapula recruitment through range
- Incorporate kinetic chain
- Dynamic rhythmical stabilisation for cuff and scapula
- Closed kinetic chain work
Phase III – Strengthening (Weeks 10-16)
Goals
- Restore full active range of motion
- Optimise reactive neuromuscular stability
- Restore optimal cuff and scapula control through range and under load
- Optimise shoulder power, strength and endurance
- Return to full work, sport and recreational activities
Rehabilitation
- Regain range of motion into combined positions
- Enhance neuromuscular control through range and incorporated with kinetic chain
- Functional plyometrics
- Dynamic rhythmical stabilisation drills in risk positions
- Functional specific strengthening, power and endurance exercises for rotator cuff and scapulothoracic muscles
- Functional specific kinetic chain strength and endurance
Phase IV Overhead activity / return to work and sport (Months 4-6)
Goals
- Regain full range of motion
- Return to full strenuous work and recreational activities
Rehabilitation
- Progress strengthening as tolerated through full range of motion
- Continue shoulder stretching and strengthening at least 4 times per week
- Weight training can gradually resume with caution especially with exercises such as wide grip bench press, triceps dips, pull-downs behind the neck where the arms are repeatedly placed behind patient. Be sure to always see your elbows.
- Return to sport at 4-6 months. May initiate plyometrics / interval programme if cleared by surgeon. Incorporate return to play / contact drills
- Average return to play currently reported as 5-14 months
Rehabilitation Guidelines: Latarjet Protocol
Mr. Hannan Mullett, Consultant Shoulder Surgeon
Latarjet (corocoid transfer) is a common stabilisation procedure particularly in the setting of significant bone damage. It offers a robust reconstruction, with low re-dislocation rates and fairly predictable return to play.
These guidelines are designed to aid the therapist treating the patient who had a Latarjet procedure.
Rehabilitation considerations
It will take approx. 6-8 weeks to form an osseous union of the newly reconstructed glenoid, the biceps and coracobrachialis attachment to the coracoid needs to be protected during this initial postoperative period. For this reason, shoulder extension and external rotation range of motion needs to be gradually regained in a protected fashion after surgery.
The subscapularis is split to expose the joint during the Latarjet procedure. This may result in muscle stiffness and inhibition of subscapularis. In the early phase gentle soft tissue massage and inhibitory techniques can be useful to minimise the impact of this. Once strengthening commences it is important to monitor and address any deficits in subscapularis strength.
Phase I (Weeks 0-4)
Goals:
- Protect the integrity of the surgical repair
- Minimise shoulder pain and inflammatory response
- Gradual restoration of passive range of motion
- Enhance scapular stability
- Improve proprioceptive acuity
Rehabilitation
- Sling to be worn generally apart from showering and rehab. If the arm is supported i.e. sitting on a couch or desk the arm can be gently used out of the sling. Arm below elbow can be used e.g. writing, using laptop/phone. Avoid excessive passive range of motion for first 10 days to avoid haematoma formation. Can wean out of sling after 3 weeks if comfortable
- Elbow/wrist/Hand range of motion and grip strengthening
- Begin shoulder passive range of motion; forward flexion to tolerance, abduction in the plane of the scapula to tolerance
- Avoid combined abduction / external rotation
- Avoid force end range mobilisation especially external rotation
- Closed kinetic chain / proprioceptive exercises
- Cuff facilitation exercises within range outlined
- Scapula mobilisation / facilitation exercises
- Kinetic chain exercises with arm in sling to include thoracic spine rotation
- Heat/Ice before and after PT sessions. Do not force painful motions
Phase II. (Weeks 4-10)
Goals
- Protect integrity of the surgical repair
- Minimise shoulder pain and inflammatory response
- Full functional range of motion
- Cuff recruitment and scapula control
- Wean out of sling
- Begin light active, waist level activities
Rehabilitation
- Discontinue sling immobilisation fully at 4 weeks if comfortable. (wean from 3 weeks)
- Therapeutic Exercise
- 4-6 weeks: Begin gentle AAROM exercises (supine position
- 6-10 Weeks: Progress to active exercises using gravity as resistance, shoulder flexion from supine, with trunk flexed to 45° in upright position, to standing. Begin deltoid and biceps strengthening.
- Initiate balanced strengthening. Exercises should be progressive in terms of intensity, shoulder elevation and stress on anterior joint capsule
- Scapular stability; retractors and upward rotators
- Progress kinetic chain integration
- Isotonic ER / IR at 0 degrees of abduction and scapular plane
- Incorporate specific subscapularis re-education if required
- Rhythmical stabilization drills; ER / IR in scapular plane, Flexion / Extension and Abduction / adduction at various angles of elevation
- Modalities per PT discretion, gentle joint mobilisations (grades 1& II) if ROM is significantly less than expected.
- Do not lift objects overhead with the weight of the object going behind the head i.e. keep weight in view in front
Phase III – Strengthening (Weeks 10-16)
Goals
- Normalise strength, endurance, power and neuromuscular control
- Return to chest level full functional activities
- Gradual and planned progressive load to anterior joint capsule
- Restore optimum cuff and scapula control through range and under load
Rehabilitation
- Range of motion -progress to full AROM without discomfort
- Therapeutic Exercise
- Continue and progress with Phase II exercises
- Continue with scapular strengthening; PNF with light resistance, serratus punch plus, CKC push up plus (progress from wall, counter, knees on floor, floor)
- Preparatory and reactive stabilization drills in risk positions
- Function specific plyo-metrics
Phase IV Overhead activity / return to work and sport (Months 4-6)
Goals
- Regain full range of motion
- Return to full strenuous work and recreational activities
Rehabilitation
- Progress strengthening as tolerated through full range of motion
- Continue shoulder stretching and strengthening at least 4 times per week
- Weight training can gradually resume with caution especially with exercises such as wide grip bench press, triceps dips, pull-downs behind the neck where the arms are repeatedly placed behind patient. Be sure to always see your elbows.
- Review at 4 months check xray to check graft incorporation
- Return to sport at 4-6 months. May initiate interval programme if cleared by surgeon. Incorporate return to play / contact drills.
- If satisfactory progression most athletes return to play by 6 months
Post Operative Guidelines –
ACJ Stabilisation- Soft tissue Reconstruction using synthetic ligament
Mr.Hannan Mullett ,Consultant Shoulder Surgeon
This surgery is undertaken to stabilise a symptomatic unstable ACJ following injury. It is an open procedure and it is vital to protect the repair
Goals
- Protect surgical soft tissue repair.
- Avoid re-dislocation secondary to failure or stretching out of the synthetic device prior to adequate healing
- Gentle stretching and regaining range of motion.
- Gentle strengthening
- Return to sports
Phase I – Joint protection (0-6 weeks)
- Patients generally wear a sling for 3-week period followed by a further period of 3 weeks when patients wean out of sling but protect it against lifting etc.
- Regular cryotherapy
- Posture awareness and scapular setting.
- Patients can use the arm below the elbow e.g. using computer, reading immediately following surgery
- Active assisted flexion as comfortable.
- Active assisted ER to 30°
- Do not force or stretch
Phase II (6-12 weeks)
- Progress active assisted to active ROM. Gradually increase ROM but do not push overhead activities
- Glenohumeral stability; sub maximal isometrics rotator cuff in neutral
- Scapular stability; serratus anterior, upper and lower trapezius strength
- Proprioception through open and closed chain exercises
- Core stability
Phase III (12 weeks +)
- Progress strengthening. Isometrics in variable starting positions progressing to resisted through range strengthening
- Sport specific rehabilitation
- Plyometric and perturbation work
Functional Milestones
- Driving -depends on side and whether automatic generally after 4-6 weeks when patient has adequate control
- Swimming – 16 weeks
- Cycling – 8-12 weeks
- Golf – 16 -20. weeks
- Rugby – 4-6 months
Detailed Anatomy of the shoulder
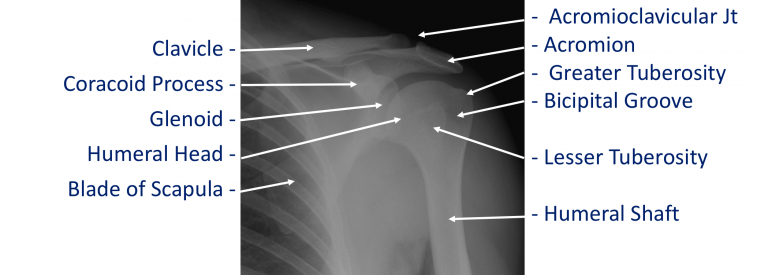
The shoulder is made of up 3 bones that interact together to for a supporting structure for the upper limb. We refer to this grouping of bones as “the shoulder girdle”. The bones of the shoulder girdle are;
- The Humerus – the upper arm bone with the ‘humeral head’ (the ball of the shoulder joint) on the top end
- The Scapula – the shoulder blade. There a number of parts to the scapula.
- the ‘glenoid’ (the socket of the shoulder joint)
- the ‘acromion’ (which covers the top of the glenohumeral joint and attaches the scapula to the clavicle)
- the ‘coracoid’ (a bony ridge at the front of the scapular to which a number of ligaments and muscles attach)
- The Clavicle – the collar bone which connects the acromion part of the scapula to the sternum (the breast bone) ‘strutting’ the shoulder out. This is the only direct bone connection that the shoulder girdle has with the rest of the skeleton.
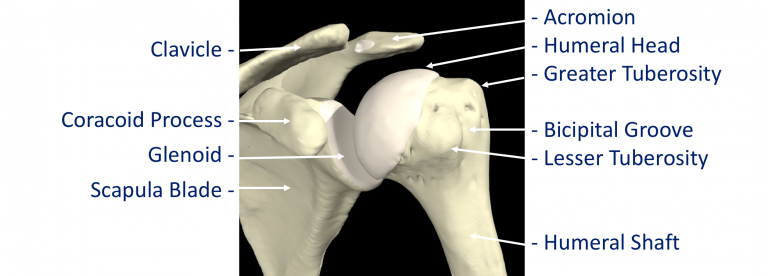
Where a bone come into contact with another is known as a joint. The joints of the shoulder are;
- The Glenohumeral Joint – formed between the humeral head (ball) and the glenoid (socket).
- The Acromioclavicular Joint – the joint that connects the scapula to the outer end of the clavicle
- The Sternoclavicular Joint- the joint that connects the inner end of the clavicle to sternum. This is the only bony connection between the ‘shoulder girdle’ and the main the skeleton
- The Scapulothoracic Joint – this joint involves the movement of the scapula over the ribs at the back of the chest. This is a ‘psuedo’ joint (not a real joint as it does not have any articular cartilage.
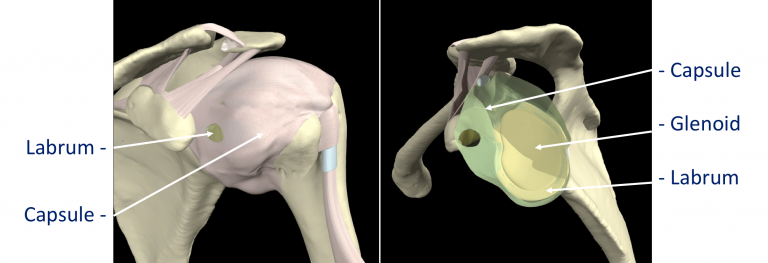

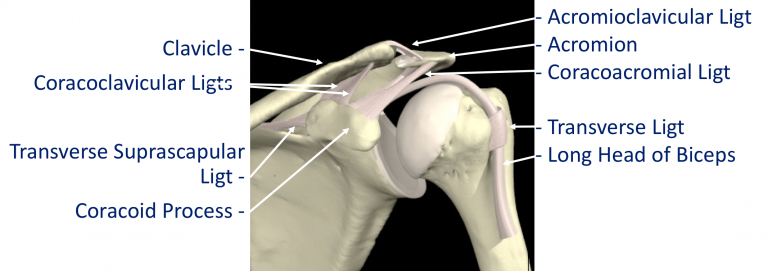
The tissue components within the Shoulder Joint itself;
- The Glenoid Labrum – this is a ‘rim’ of tissue that goes around the outer edge of the glenoid, the tendon of the long head of biceps attaches to the top part of the labrum. The labrum effectively deepens the glenoid socket which helps to increase the stability of the humeral head. It works a bit like a ‘chock’ under a wheel preventing the head from ‘rolling’ over the edge.
- The Joint Capsule – this is a watertight sac that surrounds the joint. It is formed circumferentially from around the base of the glenoid socket and passes outwards to join circumferentially around the neck of the humeral head. The inner lining of the sac is covered with synovial tissue which produces synovial fluid that lubricates the joint and provides joint nutrition.
The bones and joint of the shoulder are held in position by strips of very strong tissue, known as ligaments. They attach bone to bone where as a tendon attaches muscle to bone. The main ligaments of the shoulder girdle are:
- The Glenohumeral Ligaments (GHL)– within the joint capsule there are 4 strong ligaments that connect the glenoid to the humerus. These are the main structures that keep the shoulder in place and stop it from dislocating. There are 3 ligaments at the front (Superior, Middle & Anterior Inferior Glenohumeral Ligaments) and 1 ligament at the back of the joint (Posterior Inferior Glenohumeral Ligament).
- The CoracoAcromial Ligament (CAL) – this ligament connects the acromion to the coracoid forming a tunnel. The Rotator Cuff tendons pass under this tunnel. In some circumstances the tip of the acromion and the ligament can thicken and cause Impingement to the tendons as they run underneath
- The Acromioclavicular Ligaments (ACL) – these are short ligaments that attach the clavicle to the acromion within the acromioclavicular joint (AC jt)
- The Coracoclavicular Ligaments (CCL) – these are 2 ligaments that connect the clavicle to the coracoid. They help to supply additional stability to the clavicle and the ACjt.
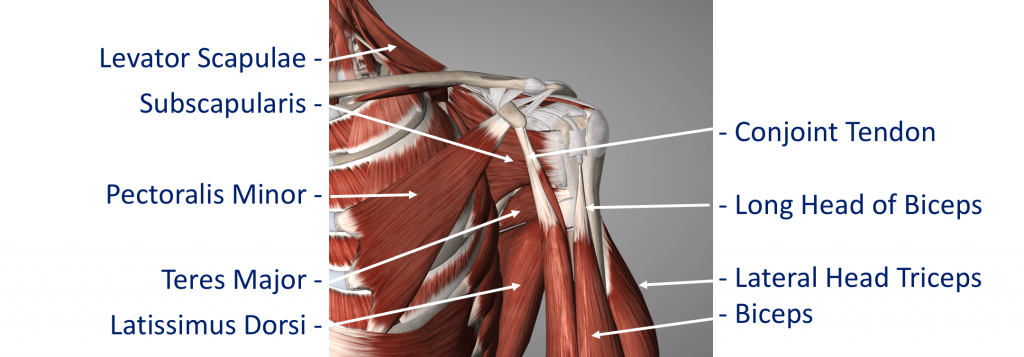
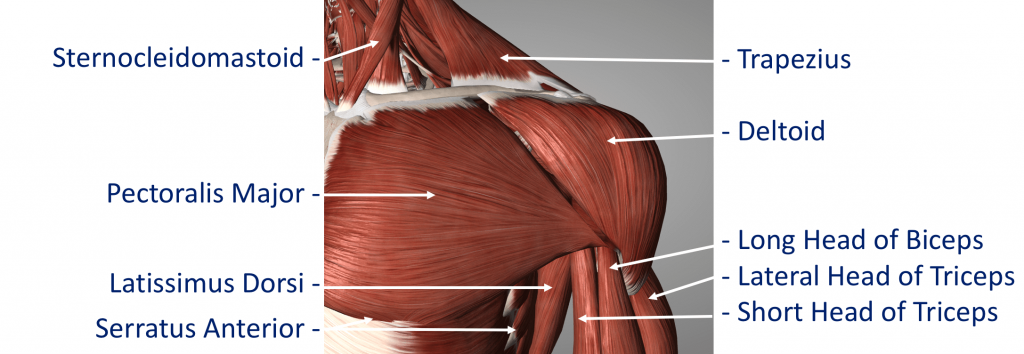
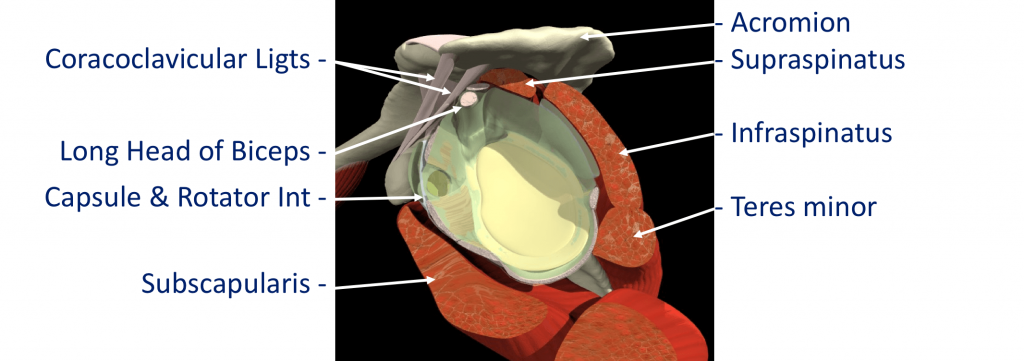
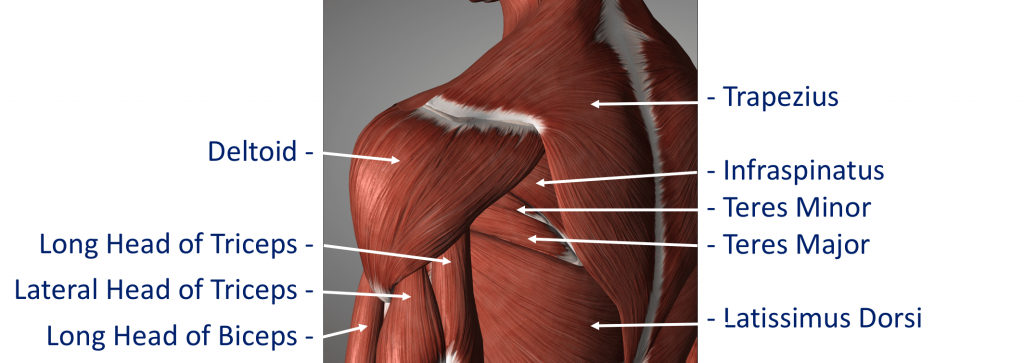
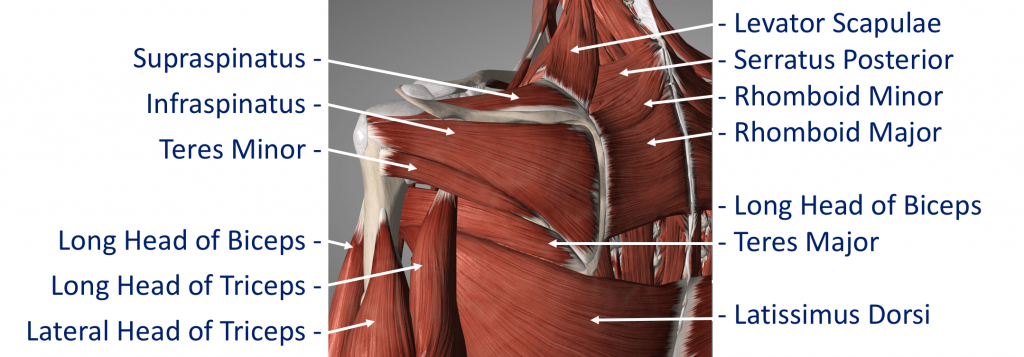
The Rotator Cuff
This refers to a group of muscles that hold the head of the upper arm into the socket of the shoulder. These muscles all insert into the bone as tendons so we often refer to the structure as the rotator cuff tendons. This layer lies on top of the bones and connective tissue.
The Rotator Cuff Tendons – this is formed by a group of 4 tendons that connect the deepest layer of 4 muscles to the humerus. These muscles are,
- Subscapularis
- Supraspinatus
- Infraspinatus
- Teres Minor
The muscles surround the shoulder and as their 4 tendons pass over the joint they converge together. As these bands of tissue attach onto the humerus they blend together and form a ‘tendon cuff’. This is known as the Rotator Cuff
The Biceps Tendon – the Biceps muscle, on the front of the arm, is formed from 2 tendons; the long head and short head. The Long Head of Biceps tendon begins at the top of the glenoid (with the labrum) and passes out through the shoulder joint to connect to the biceps muscle. The Rotator Cuff tendons and the Long Head of Biceps tendon are positioned very close to each other and are often both affected by injury at the same time. The Rotator Cuff tendons pass underneath the acromion through the Subacromial Space as they insert into the humerus (Fig 9). The narrow ‘clearance space’ underneath the acromion is the commonest place for Rotator Cuff problems to occur.
Additional supporting muscles
There are a large number of muscles around the shoulder which are responsible for moving, stabilising and supporting the shoulder girdle. The muscles can be divided into 4 groups.
Deep Muscles (Intrinsic / Rotator Cuff Muscles) – these are the 4 muscles mentioned earlier whose tendons form the rotator cuff. The muscles all arise from the blade (flat surface) of the scapula and pass over the shoulder joint with the tendons attaching onto the humerus.
- Subscapularis
- Supraspinatus
- Infraspinatus
Teres Minor These muscles often function as a group and are involved in raising, rotating and moving the shoulder in many directions. The combined pull of the Rotator Cuff muscles also pulls the humeral head into the socket of the glenoid helping to stabilise the glenohumeral joint.
Intermediate Muscles – These muscles provide additional stability and strength to the glenohumeral joint and the shoulder girdle.
Superficial Muscles (Extrinsic) – These are the large muscles that can be seen around the shoulder externally and provide strength and powerful movements. • Deltoid – this is the large muscle over the top and the front of the shoulder which provides the power to lift the shoulder after the rotator cuff muscles have begun the movement
Pectoralis Major – this is the large muscle over the front of the chest.
Biceps – this is the powerful muscle over the front of the upper arm that flexes the elbow. One of the Biceps tendons (the Long Head) arise from within the shoulder joint. Problems can occur with the stability of the Shoulder if the sequential rhythm in which these muscles contract to move the shoulder is disturbed
Back Muscles (Posterior) – these muscles are involved in suspending the scapula onto the back of the chest wall, stabilising the scapula and moving the scapula over the chest wall (scapulothoracic joint). A number of these muscles, including trapezius, levator scapulae and the rhomboids, originate from the vertebrae of the cervical and thoracic spine. Problems can occur with the smooth movement of the scapula over the chest wall if these muscles are weakened or are not working properly.
Patient Booklets
Latarjet
